
This guide takes you from an empty domain to a live WooCommerce dropshipping store accepting real orders. Every step is here.
You will not need to leave this page to buy hosting, install WordPress, connect a supplier, or set your pricing.
Most dropshipping guides list plugins and skip the parts that actually determine whether the business works: what everything costs once hosting and fees are added, and what your real margin looks like after AliExpress supplier prices, payment fees, and ad spend.
Both are covered here with real numbers, not vague ranges.
Key Takeaways
- WooCommerce itself is free. A working dropshipping store still costs $250 to $600 in the first year once hosting, a dropshipping plugin, and a theme are added.
- AliDropship is a one-time $89 fee with no subscription. DSers is free to start but caps features until you pay $19.90 or more per month.
- Commodity AliExpress margins are thin in 2026, typically 10 to 25 percent, because every dropshipper reaches the same supplier catalog. Profitability now comes from niche and supplier quality, not markup alone.
- A $15 product with a 40 percent markup nets roughly $2 to $4 after gateway fees and ad spend at low volume. The math improves once fixed costs spread across more orders.
- Setup takes 4 to 8 hours end to end. That is longer than Shopify’s 1 to 2 hours, in exchange for no monthly platform fee.
Part 1: Complete Setup, Every Step
Step 1: Buy a Domain
Go to a domain registrar and search your store name. Expect to pay $10 to $20 for the first year on a standard .com.
If your hosting provider bundles a free domain in its first-year plan (several do), skip this step and register the domain during hosting checkout instead.
That is usually cheaper than buying the domain separately.
Step 2: Buy Hosting
Hosting matters more than beginners expect. A dropshipping store on $3/month shared hosting slows down the moment real ad traffic hits it, which costs you sales at checkout.
| Hosting Tier | Monthly Cost | Fit for Dropshipping |
|---|---|---|
| Budget shared hosting | $3 to $10 | Testing only, not for live ad traffic |
| Managed WordPress | $15 to $25 | Solid starting point for a real store |
| Managed WooCommerce | $25 to $80 | Once you pass 100 orders a month |
For a new dropshipping store, Hostinger is a practical starting point on price. Namecheap bundles hosting and domain registration in one checkout if you want both from a single account.
Once you are past testing and running consistent ad traffic, Kinsta and WP Engine both handle WooCommerce order volume without the slowdowns budget shared hosting shows under load.
InMotion Hosting and Thamara are worth comparing on price for a managed plan without Kinsta or WP Engine’s higher tiers.
Sign up, choose a plan, and complete checkout. You will land in a hosting control panel (usually cPanel or a similar dashboard).
Step 3: Install WordPress
From your hosting dashboard, click Add website and choose WordPress.
For this guide, we’re using Hostinger’s onboarding process as an example. The screens may look slightly different on other hosting providers, but the overall installation steps are nearly identical.
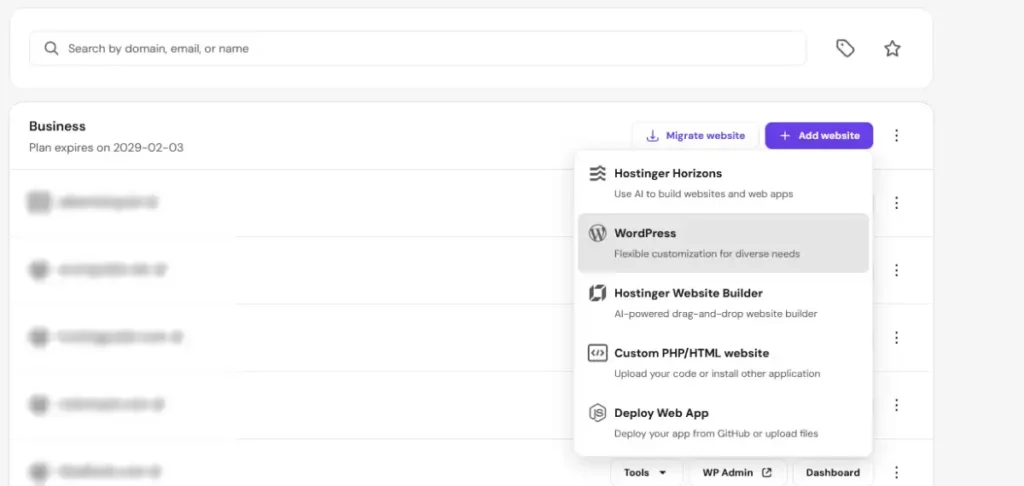
2. Enter your domain name.
If you’re still building your website, click Use temporary domain so you can finish designing and testing everything before connecting your real domain.
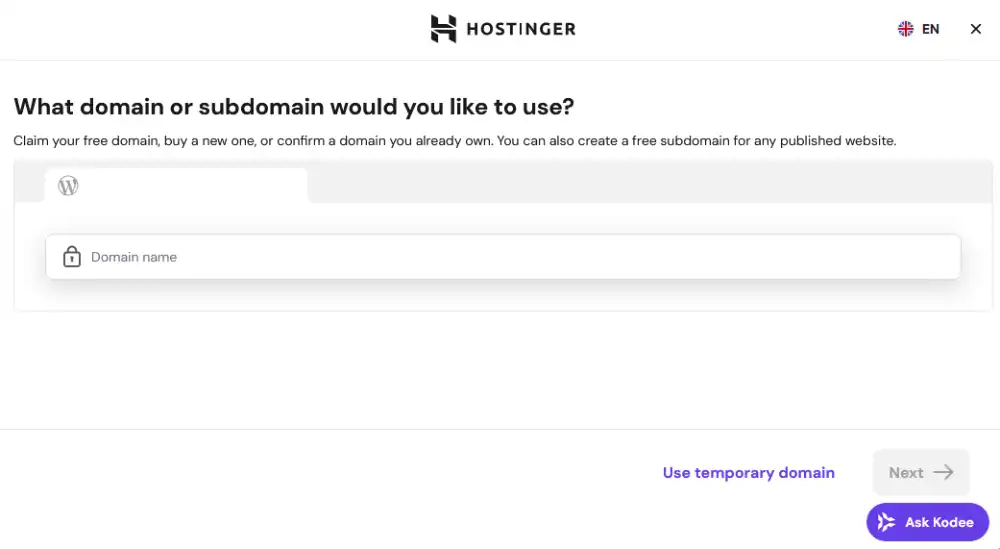
3. Create your WordPress admin account.
- Select your preferred WordPress language.
- Enter your administrator email.
- Create a strong password and save it somewhere safe.
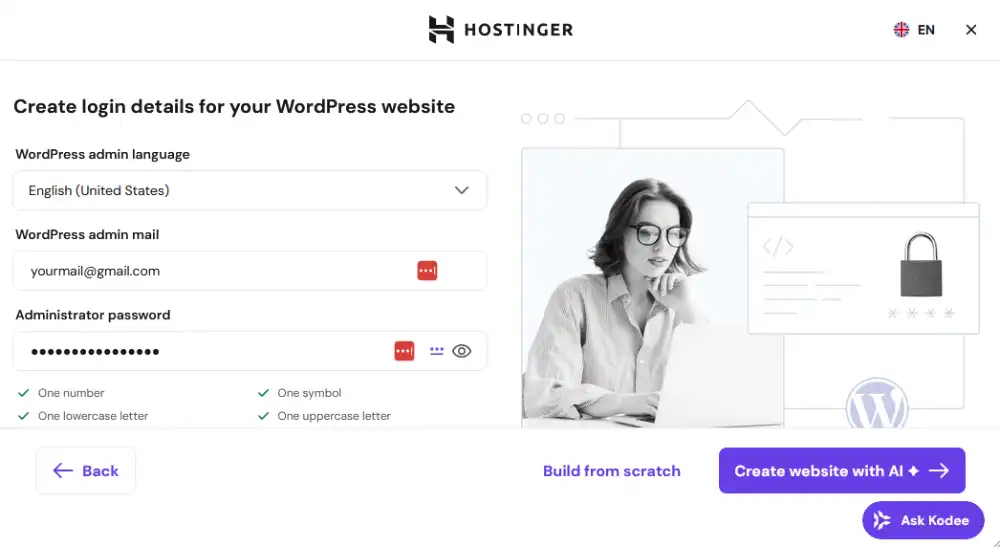
4. Click Build from scratch (or Create website with AI if you want AI to generate a starter site).
Hostinger will automatically install WordPress. This usually takes 1–2 minutes.
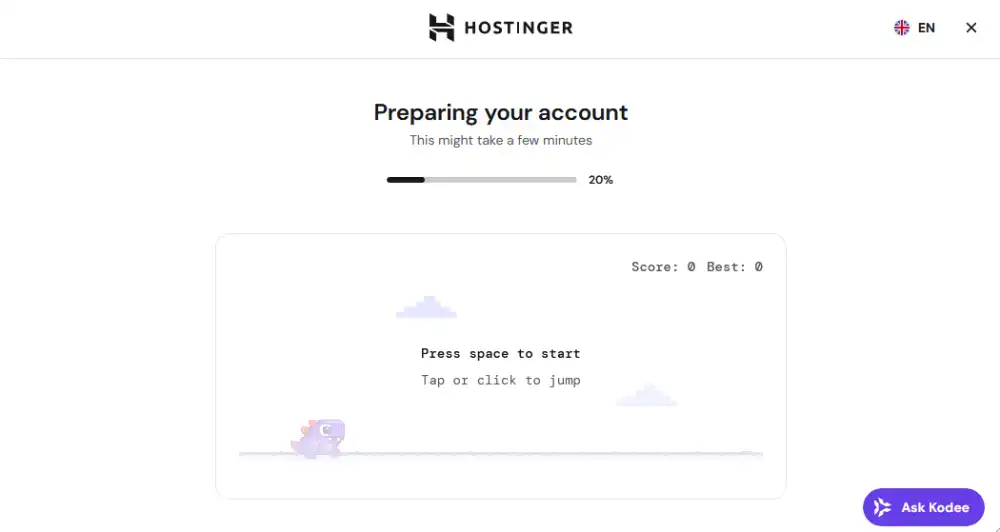
Once the installation finishes, you can access your website at yourdomain.com and log in to the WordPress dashboard at:
yourdomain.com/wp-admin
Tip: Use the temporary domain while building your website. Once everything looks good, connect your real domain and make your site live.
Step 4: Install WooCommerce and Run the Setup Wizard
Log in to your WordPress admin.
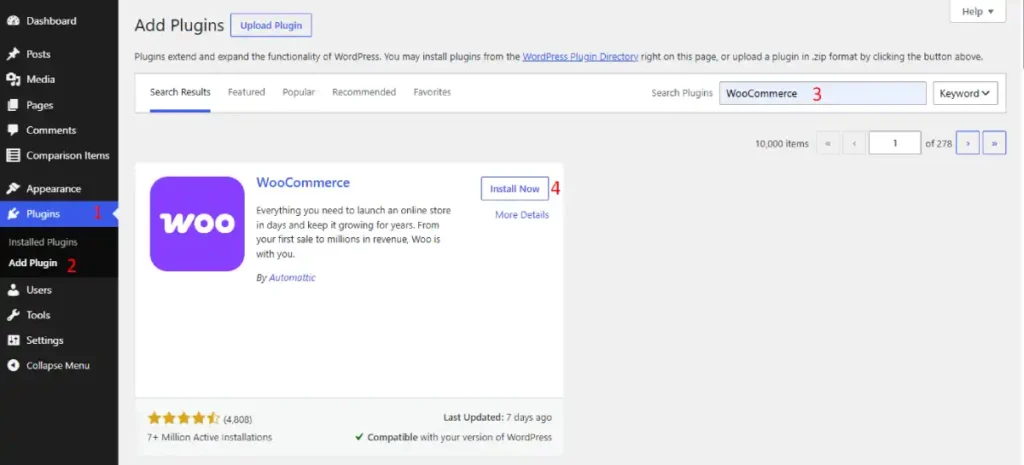
- Go to Plugins, then Add New Plugin
- Search WooCommerce
- Click Install Now, then Activate
- WooCommerce launches its setup wizard automatically
Work through every wizard screen:
Store details. Enter your country and address. This sets your default currency and tax defaults, so enter it accurately.
Industry. Select the category closest to your dropshipping niche. This only affects which starter recommendations WooCommerce shows you later, it does not lock you in.
Product types. Select Physical products.
Business details. Answer how many products you plan to list. Honest answers here just tune WooCommerce’s onboarding tips.
Theme. Skip the wizard’s theme suggestion. You will choose one specifically in Step 5.
When the wizard finishes, WooCommerce has already created your Shop, Cart, Checkout, and My Account pages automatically.
Step 5: Choose and Install a Theme
A dropshipping store lives or dies on how fast a visitor can browse and reach checkout. Skip generic blog themes.
Go to Appearance → Themes, then click Add Theme.
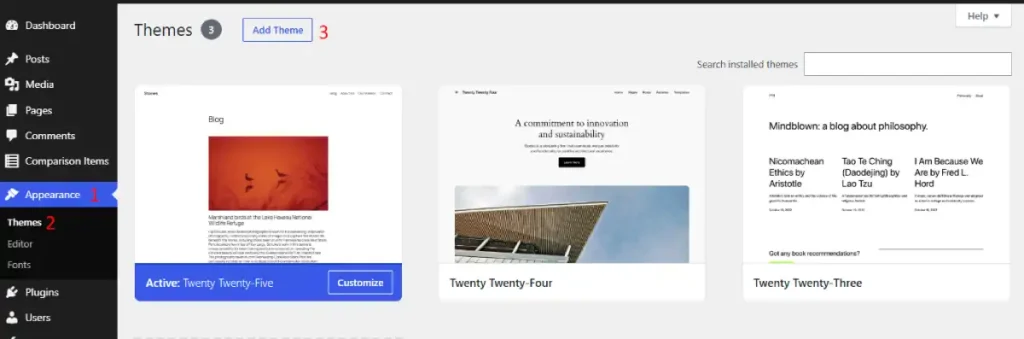
- Search for Storefront or Astra. Storefront is the official free WooCommerce theme with excellent compatibility, while Astra is a lightweight, high-performance theme that includes WooCommerce Starter Templates.
- Want more built-in ecommerce features? Consider premium themes like Flatsome or WoodMart. Both are popular choices for growing WooCommerce stores.
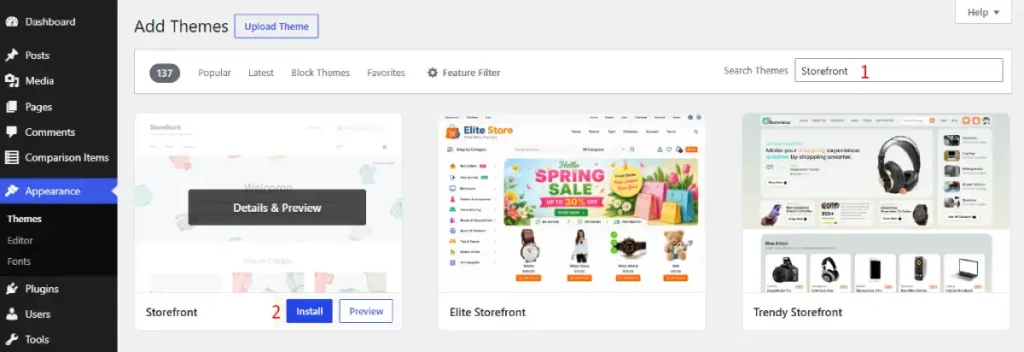
- Click Install, then Activate.
- If you choose Astra, install the Starter Templates plugin when prompted and import a WooCommerce starter site. This gives you a professionally designed storefront in minutes instead of building every page from scratch.
Recommendation: For most beginners, Astra is the better option because its ready-made WooCommerce templates help you launch a polished online store much faster.
Step 6: Install Your Dropshipping Plugin
This decision shapes supplier access, automation, and ongoing cost.
| Plugin | Price | Automation | Best For |
|---|---|---|---|
| AliDropship (Woo) | $89 one-time, no subscription | High, Chrome extension import and order automation | Avoiding a second recurring bill next to hosting |
| DSers | Free to start, $19.90 to $499/month | High, bulk order placement, supplier comparison | Stores planning to pass 50 to 100 orders a month |
| WooDropship | Pricing varies by source, confirm on the vendor site before buying | Moderate, Chrome extension import | Small catalogs, verify current price first |
Option 1: AliDropship (Woo)
Finish: Enter your license key when prompted.
One-time payment: $89 (lifetime license for one store).
Includes: One-click AliExpress imports, automated order fulfillment, Chrome extension, and image watermark removal.
Install: Go to Plugins → Add New Plugin → Upload Plugin, upload the AliDropship ZIP file, then click Install Now and Activate.
Option 2: DSers
- Official AliExpress dropshipping partner for WooCommerce.
- Free plan available; Advanced ($19.90/month) adds bulk ordering and advanced automation.
- Install: Go to Plugins → Add New Plugin, search DSers, then click Install Now and Activate.
- Finish: Click Get Started and connect your WooCommerce store.
Option 3: Ali2Woo
- Premium WooCommerce plugin with one-time pricing.
- Purchase and download the plugin from Ali2Woo.
- In WordPress, go to Plugins → Add New Plugin → Upload Plugin, upload the ZIP file, then click Install Now → Activate.
Option 4: ALD – AliExpress Dropshipping & Fulfillment
- Premium WooCommerce plugin with product importing, inventory syncing, and automated fulfillment.
- Purchase and download the plugin from ALD – AliExpress Dropshipping & Fulfillment.
- In WordPress, go to Plugins → Add New Plugin → Upload Plugin, upload the ZIP file, then click Install Now → Activate.
Note: The remaining setup steps in this guide work for both plugins, even if the menus and screenshots look slightly different.
The rest of this guide covers setup steps common to both. Screenshots and menu names differ slightly by plugin, but the sequence is the same.
Step 7: Connect Your Supplier Account
Create an AliExpress account if you do not already have one. Both AliDropship and DSers connect to this account to pull product data and place supplier orders.
- Install your plugin’s Chrome extension from the Chrome Web Store (both AliDropship and DSers offer one)
- Log into the extension using your plugin account credentials
- Confirm the extension shows as connected to your WooCommerce store when you visit your WordPress admin
Step 8: Import Your First Products
Browse AliExpress for products in your niche with the Chrome extension active.
- Open a product page on AliExpress
- Click your plugin’s import button (usually appears as a floating button on the page)
- The product, images, description, and variants land in your plugin’s import list inside WordPress
- Edit the title, description, and images to remove AliExpress branding before publishing
- Click Push to Store or Import to Store to make it live on your WooCommerce site
Before importing anything, check three things on the AliExpress listing: the supplier rating (aim for 4.5 stars or higher with over 1,000 orders), the shipping time shown to your target country, and whether a competitor is already selling the identical item cheaper. Skipping this check is the most common reason new stores fail to convert traffic into sales.
Step 9: Set Your Pricing Rules
Set this before importing products in bulk. Changing pricing rules after hundreds of products are live is tedious.
- In your plugin’s settings, find Pricing Rules or Price Formula
- Set a base multiplier: supplier cost times 2.5 to 3 is a reasonable starting point
- Enable round-to-.99 pricing so listed prices end in a psychological price point
- Set tiered rules if your plugin supports them: higher percentage markup on low-cost items, lower percentage but higher fixed markup on expensive items, since a flat 3x multiplier prices a $200 item out of the market instantly
A $12 supplier item at a 2.67x multiplier lists at $32.
Step 10: Connect a Payment Gateway
- Go to WooCommerce, then Settings, then Payments
- Click Enable next to WooPayments (WooCommerce’s own Stripe-based option) or install the Stripe plugin directly
- Follow the on-screen prompts to connect your bank account and business details
- This takes about five minutes and does not require leaving your WordPress dashboard
Standard processing runs 2.9 percent plus $0.30 per transaction, regardless of which gateway you pick. This is a real cost, factor it into your margin math, not an afterthought.
Run one test transaction using your gateway’s test mode before accepting real orders. Confirm the order appears in WooCommerce, the confirmation email sends, and the inventory count updates.
Step 11: Configure Shipping
Your supplier controls actual delivery, not you, so your WooCommerce shipping settings should reflect what you charge the customer.
- Go to WooCommerce, then Settings, then Shipping
- Click Add Shipping Zone, name it (for example, United States), and select the countries it covers
- Add a Flat Rate shipping method, or Free Shipping if you have built the shipping cost into your product price
- Repeat for any additional regions you sell to
A common approach: build a $3 to $6 shipping cost into your listed product price so checkout shows free shipping, which converts better than a visible shipping charge at checkout.
Standard AliExpress shipping runs 15 to 30 days. AliExpress Premium Shipping, a paid upgrade you select per order, cuts this to 7 to 15 days at a higher supplier cost. Consider offering this as a paid shipping upgrade at your checkout rather than absorbing the cost silently.
Step 12: Set Up Required Legal Pages
Every WooCommerce store needs these three pages before accepting real payments. WooCommerce creates basic templates for some of these automatically during setup; check and complete them under Pages in your WordPress admin.
- Privacy Policy. WooCommerce auto-generates a starter template during setup. Go to Pages, find Privacy Policy, and fill in your business name and any third-party services you use (payment processor, email tool, analytics).
- Refund and Return Policy. Create a new page under Pages, Add New. State your return window, who pays return shipping, and how refunds are processed. Since dropshipping refunds route through your supplier, be specific about how long processing takes.
- Terms of Service. Create a new page covering order acceptance, pricing errors, and liability. A template generator or a short consultation with a business attorney is worth the cost here if your store handles meaningful volume.
Add all three to your site footer menu under Appearance, then Menus.
Step 13: Test a Complete Order
Place one real order through your live store as if you were a customer.
- Add a product to the cart
- Proceed through checkout using your gateway’s test card
- Confirm the order appears correctly in WooCommerce under Orders
- Confirm your plugin generated the supplier order correctly, or shows you a pre-filled AliExpress order page to place manually
- Confirm the order confirmation email arrived in your inbox
- Confirm tracking syncs back to the order once you mark it fulfilled
This single test catches most configuration errors before a real customer becomes the test case.
Part 2: Real Margins, With the Math Shown
Why Margins Are Thinner Than Older Guides Claim
Every WooCommerce dropshipper connecting to AliExpress reaches the same supplier catalog. The product you found is likely already sold by dozens of other stores, which compresses margin through price competition.
Commodity AliExpress margins in 2026 typically run 10 to 25 percent, well below the 50 percent-plus figures common in older dropshipping content.
This does not mean the model is unprofitable. It means real profit now comes from niche selection and supplier quality rather than pure markup, often by shifting toward higher-quality US or EU supplier networks for products where faster shipping justifies a higher price.
A Worked Example
A $12 supplier cost product, marked up to $32, sold to a US customer:
| Line Item | Amount |
|---|---|
| Listed price | $32.00 |
| Supplier cost | -$12.00 |
| Payment processing (2.9% + $0.30) | -$1.23 |
| Shipping absorbed into price | -$3.50 |
| Gross margin before ad spend | $15.27 |
That $15.27 is not profit yet. Facebook or TikTok ad cost during a new product’s testing phase typically runs $8 to $15 per acquisition. At $12 CPA, real profit per order is roughly $3.27, and it can go negative on products that have not found a working ad angle.
Margin at Different Revenue Levels
Fixed plugin and hosting costs matter less as volume grows, since they spread across more orders.
| Monthly Revenue | Orders (at $32 AOV) | Fixed Plugin + Hosting Cost | Fixed Cost per Order |
|---|---|---|---|
| $1,000 | ~31 | $35 | $1.13 |
| $5,000 | ~156 | $45 | $0.29 |
| $25,000 | ~780 | $85 | $0.11 |
This is why AliDropship’s one-time fee suits low volume and DSers’ subscription earns its cost only once volume justifies its automation.
WooCommerce Dropshipping vs Shopify Dropshipping
| Factor | WooCommerce | Shopify |
|---|---|---|
| Platform cost | $0 (plugin only) | $39/month minimum |
| Setup time | 4 to 8 hours | 1 to 2 hours |
| Dropshipping plugin | $89 one-time to $19.90+/month | $10 to $30/month per app |
| Hosting | $15 to $80/month, your responsibility | Included |
| Transaction fee (non-native payments) | None | 0.5 to 2% |
| Maintenance | Your responsibility | Handled by Shopify |
WooCommerce wins on cost specifically while testing a niche. AliDropship’s $89 fee plus $15/month hosting is roughly $30 in month one, under Shopify’s $39 subscription before adding a single app.
Shopify wins on speed once you want to launch fast and are comfortable trading a monthly fee for zero infrastructure management.
Advanced: Scaling Past the First 100 Orders
Multi-supplier sourcing per product. A single supplier going out of stock should not take down your best-selling item.
DSers and similar tools let you map two or three suppliers to one listing, falling back automatically if your primary is unavailable.
Automated inventory sync. At volume, checking supplier stock manually is not sustainable. Confirm your plugin’s automatic stock sync is active, since manual review is where overselling and refund-driving stockouts start.
Separate pixel tracking from your theme. Install Meta Pixel and any TikTok pixel through a dedicated plugin (PixelYourSite or similar) rather than pasting tracking code into functions.php. This survives theme updates.
Plan for chargebacks before volume makes them costly. Dropshipping sees higher chargeback rates than average eCommerce because delivery windows run longer than customers expect.
A clear shipping-time disclosure on product pages and in confirmation emails reduces disputes, since fighting a chargeback costs $15 to $25 per dispute regardless of outcome.
Understand tax nexus before it becomes a problem. Dropshipping across state and international lines can trigger sales tax obligations depending on volume and destination. Consult a tax professional once you process meaningful volume, since rules vary by state and change over time.
FAQ’s
Is WooCommerce good for dropshipping?
Yes, particularly for testing a niche before committing to a monthly subscription. WooCommerce is free, and a functional setup costs $250 to $600 in year one including hosting and a plugin, less than a year of Shopify’s base subscription.
What is the best WooCommerce dropshipping plugin?
AliDropship suits stores avoiding a recurring subscription, at a one-time $89 fee. DSers suits stores planning to pass 50 to 100 orders a month, since its paid automation pays for itself at that volume.
How much does it cost to start WooCommerce dropshipping?
Budget $250 to $600 for year one: domain ($10 to $20), hosting ($180 to $300), and a plugin ($89 one-time for AliDropship, or $0 to $240/year for DSers). Payment processing fees apply on top and scale with sales.
What are realistic dropshipping profit margins right now?
Commodity AliExpress margins typically run 10 to 25 percent. On a $32 product with a $12 supplier cost, real profit per order often lands at $3 to $5 after advertising cost during a product’s testing phase.
Can I dropship on WooCommerce for free?
The WooCommerce plugin is free, but running a real store is not. Hosting starts around $15/month, and while DSers has a free plan, its limits (3 stores, no bulk ordering) mean most stores upgrade once they have real volume.
How long does full setup take?
Plan for 4 to 8 hours: hosting and WordPress setup, theme install, plugin configuration, product import, payment testing, and legal pages. Longer than Shopify’s 1 to 2 hours, the trade-off for no monthly platform fee.
Do I need a business license to start dropshipping on WooCommerce?
Requirements vary by country and state. Many operators start as a sole proprietor with no formal registration, then register an LLC once revenue justifies the liability protection. Check your local requirements before processing meaningful order volume.