
Most OpenCart stores that break do so at the same point: SEO URLs enabled, homepage working, every other page returning a 404.
This is not a rare edge case, it is the single most common OpenCart support thread on the platform’s own forum, and it happens because getting clean URLs working requires five separate things to be correct at once, not just one setting flipped in the admin panel.
This guide covers real server requirements, how to choose hosting that will not fight you later, the full installation, and the exact configuration chain that prevents the 404 problem before it happens.
Key Takeaways
- OpenCart 4.x needs PHP 7.4 or higher (8.1 recommended for current releases), MySQL 5.7 or MariaDB equivalent, and specific PHP extensions enabled, not every budget host ships all of these by default.
- The 404-after-enabling-SEO-URLs problem has five separate causes, and all five must be correct simultaneously: the htaccess file renamed, mod_rewrite enabled, AllowOverride set to All, the RewriteBase matching your actual install path, and the admin toggle switched on.
- Nginx hosts do not use .htaccess at all. If your host runs Nginx instead of Apache, the standard OpenCart .htaccess instructions do nothing, you need server-level rewrite rules instead.
- Shared hosting works for a small catalog under real testing. A store with real traffic and a meaningful product count benefits from a host that exposes Apache configuration access, not every shared host does.
- Performance problems on OpenCart are usually PHP opcache and image optimization, not the platform itself, both are fixable without a plugin.
Server Requirements, Confirmed
Check these against any hosting plan before purchasing, not after.
| Requirement | Minimum | Recommended |
|---|---|---|
| PHP version | 7.4 | 8.1 |
| Database | MySQL 5.7 | MySQL 8.0 or MariaDB equivalent |
| Required PHP extensions | cURL, GD, OpenSSL, Zip, MySQLi | Same, plus OPcache enabled |
| Memory limit | 128M | 256M or higher |
| Web server | Apache with mod_rewrite, or Nginx with rewrite rules configured | Apache with mod_rewrite for the simplest setup |
Contact any hosting provider directly and ask them to confirm these specifics before signing up, a generic PHP supported answer on a sales page is not the same as confirming the exact version and extensions.
Choosing Hosting That Will Not Fight You
Shared Hosting
Works for a small catalog during initial setup and testing. The real risk is not performance, it is control. Many budget shared hosts do not expose the Apache configuration access needed to fix the SEO URL problem covered below if it comes up, you are stuck submitting a support ticket and waiting.
VPS or Cloud Hosting
The practical sweet spot for most real OpenCart stores. You get root or near-root access, which means you can directly confirm and fix mod_rewrite, AllowOverride, and PHP configuration yourself rather than depending on a support queue.
Managed OpenCart Hosting
A smaller category than managed WordPress hosting, but worth searching for specifically if you want server configuration handled for you. Confirm any managed host explicitly supports OpenCart’s specific requirements above, not just general PHP hosting.
The Apache vs Nginx Question
Ask this directly before purchasing: does this host run Apache or Nginx? OpenCart’s standard .htaccess-based SEO URL configuration only works on Apache. If your host runs Nginx, you need server-level rewrite rules instead, covered later in this guide. Getting this wrong is a common, avoidable source of the exact 404 problem this guide exists to prevent.
Hosting Options Worth Considering
Not every host fits OpenCart’s technical needs equally well.
Hostinger is a strong fit specifically for OpenCart, it runs LiteSpeed, a drop-in Apache replacement with full .htaccess support, meaning the SEO URL configuration covered below works exactly as expected, and it offers a dedicated OpenCart VPS template that installs the platform automatically.
For a store that has outgrown shared hosting and needs direct server access to fix issues like the AllowOverride setting covered below, Kamatera offers cloud VPS hosting with root access, giving you full control over the Apache configuration rather than depending on a support ticket.
InMotion Hosting is a comparable option for developer-friendly VPS hosting with full LAMP stack access.
For simple shared hosting at a lower budget, Namecheap runs standard cPanel hosting compatible with OpenCart’s requirements, a reasonable starting point for a small catalog during testing.
Step 1: Prepare Your Database
- In your hosting control panel, create a new MySQL database
- Create a database user with a strong, unique password
- Assign that user full privileges on the new database
- Note the database name, username, password, and host (usually localhost) somewhere safe, you need all four during installation
Step 2: Upload OpenCart Files
- Download the current OpenCart release from opencart.com
- Upload the extracted files to your hosting account, typically into public_html or a subfolder if you are installing into one
- If installing into a subfolder, note the exact folder name, you will need it again during the SEO URL configuration
Step 3: Run the Installer
- Visit your domain in a browser, the OpenCart installer launches automatically if no installation exists yet
- Work through the installer’s license and pre-installation check screens, resolve any red flags the checker reports before continuing
- Enter your database details from Step 1 exactly as noted
- Set your admin username and a strong password
- Complete the installer
Step 4: Secure the Install Directory
- Once installation finishes, locate the install folder in your file manager
- Delete it completely, OpenCart will not let you log into the admin panel while it still exists, and leaving it is a real security risk even briefly
Step 5: Fix File and Folder Permissions
- Locate the config.php files (one in the root directory, one in the admin folder)
- Set both to a restrictive but functional permission level, commonly 644, confirm your specific host’s recommended value if unsure
- Confirm the system/storage folder (or the storage location your version uses) is writable by the server, this is required for caching, logs, and uploads to function
Step 6: Enable SEO URLs Without Triggering the 404 Problem
This is the step most tutorials rush through, and it is where most real OpenCart stores break. All five of the following must be true at once.
6a. Rename the htaccess File
- In your file manager, locate the file named htaccess.txt in your OpenCart root
- Rename it to exactly .htaccess
- Confirm the rename succeeded, some file managers hide files starting with a dot by default, enable showing hidden files if you do not see it afterward
6b. Confirm mod_rewrite Is Enabled
Contact your host or check your hosting control panel to confirm the Apache mod_rewrite module is active. Most modern hosts enable this by default, but do not assume, confirm it directly, especially on a VPS you are configuring yourself.
6c. Confirm AllowOverride Is Set to All
This is the step that trips up VPS and self-managed server users specifically. Even with .htaccess correctly renamed and present, Apache ignores it unless the server’s virtual host configuration includes AllowOverride All for your site’s directory.
On shared hosting this is usually already configured. On a VPS, check your Apache site configuration file directly and set this yourself if it is missing, then restart Apache.
6d. Set the Correct RewriteBase
Open your .htaccess file and find the RewriteBase line. This must match your actual install path exactly:
- Installed at your domain root:
RewriteBase / - Installed in a subfolder called shop:
RewriteBase /shop/
Getting this wrong is the specific cause of the pattern where your homepage works but every inner page returns a 404, since the rewrite rules are looking in the wrong location for your installation.
6e. Enable SEO URLs in the Admin Panel
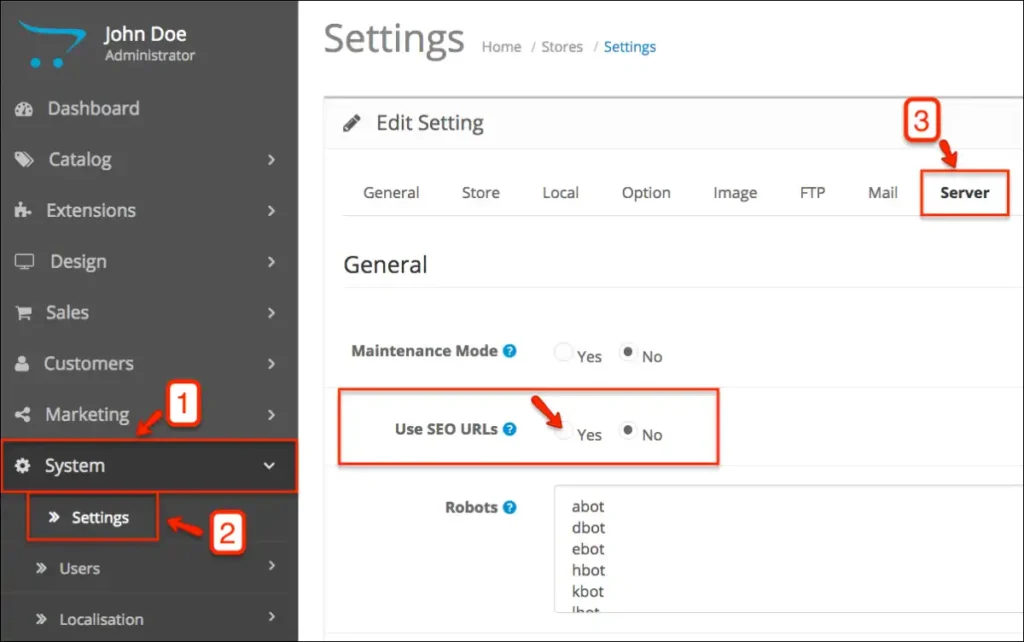
- Log into your OpenCart admin panel
- Go to Settings, then edit your store, then the Server tab
- Set Use SEO URLs to Yes
- Save
Verify It Actually Worked
Visit a product page and a category page directly, not just your homepage. Confirm both load without a 404. If either fails, work back through steps 6a through 6d in order, the fix is almost always one of those four, not a deeper platform issue.
If Your Host Runs Nginx Instead of Apache
The .htaccess approach above does nothing on Nginx, since Nginx does not read .htaccess files at all. Instead:
- Locate your Nginx server block configuration for the site, typically requiring root or SSH access
- Add rewrite rules equivalent to OpenCart’s .htaccess logic directly into the server block, OpenCart’s own documentation and community forum include current Nginx-specific configuration examples
- Reload or restart Nginx after saving changes
- Test the same way as above, a direct product and category page load, not just the homepage
If you do not have server-level access on your current host, this is a genuine reason to move to a host that provides it, or to specifically request your host’s support team apply the Nginx rewrite configuration for you.
How This Actually Looks on Hostinger
Everything above applies to any Apache-compatible host. Here is exactly what it looks like using Hostinger specifically, since it is a genuine fit for OpenCart and offers two real, different install paths.
Method A: The Dedicated VPS OpenCart Template
This is the fastest path if you purchased Hostinger’s VPS hosting, and it preinstalls OpenCart automatically.
- Log into hPanel, Hostinger’s control panel
- In the sidebar, click VPS
- Click Manage on your VPS instance
- In the side menu, go to OS & Panel, then Operating System
- Click the Application tab
- Find and select Ubuntu 24.04 with OpenCart
- Click Change OS
- Check the box acknowledging that this action deletes existing data on the VPS
- Click Next
- Set a password for your store’s control panel access
- Click Confirm
- Wait roughly 10 minutes for the template installation to complete
Once finished, OpenCart is installed and ready, this method skips the manual database creation and file upload steps completely, since the template handles them for you.
Method B: OpenCart on Hostinger Shared Hosting
This is the actual current interface for Hostinger’s shared hosting, walked through end to end. It differs from the older Softaculous-branded flow some tutorials still describe, Hostinger now runs this through its own Auto Installer inside each site’s dashboard.
Step 1: Create the website.
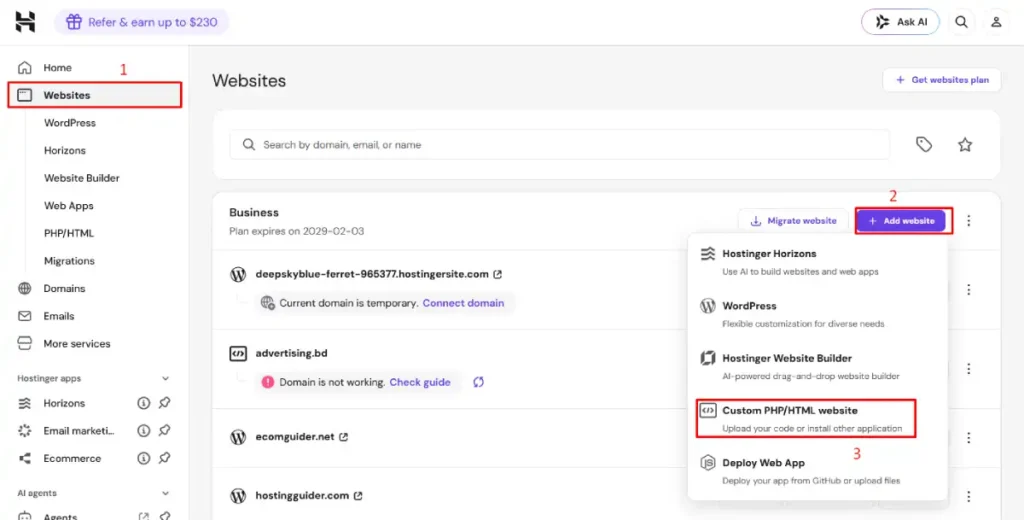
- Log into hPanel and go to Websites
- Click Add website
- A dropdown offers several options: Hostinger Horizons, WordPress, Hostinger Website Builder, Deploy Web App, and Custom PHP/HTML website
- Select Custom PHP/HTML website, since OpenCart is a standard PHP application, not one of Hostinger’s specialized builders
Step 2: Choose a domain.
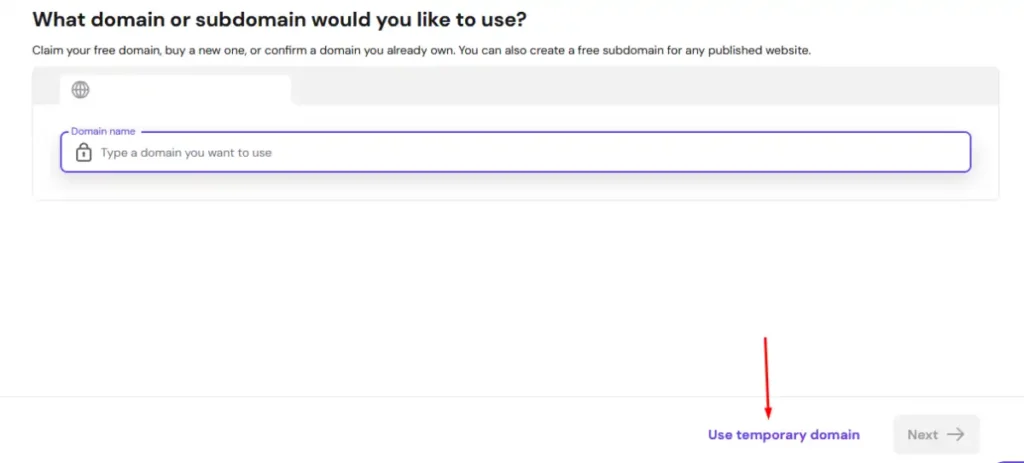
- Type a domain you already own into the field, or
- Click Use temporary domain at the bottom right
- For testing or a fresh install with no domain connected yet, the temporary domain is the faster path
- You can connect a real domain to the site later
Step 3: Wait for initialization.
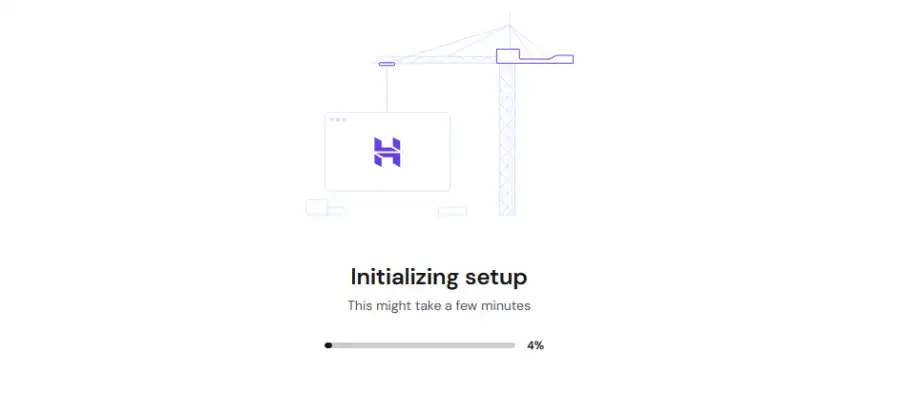
- Hostinger provisions the new site automatically
- An Initializing Setup progress screen displays
- This takes a few minutes, no action needed from you here
Step 4: Open Auto Installer.
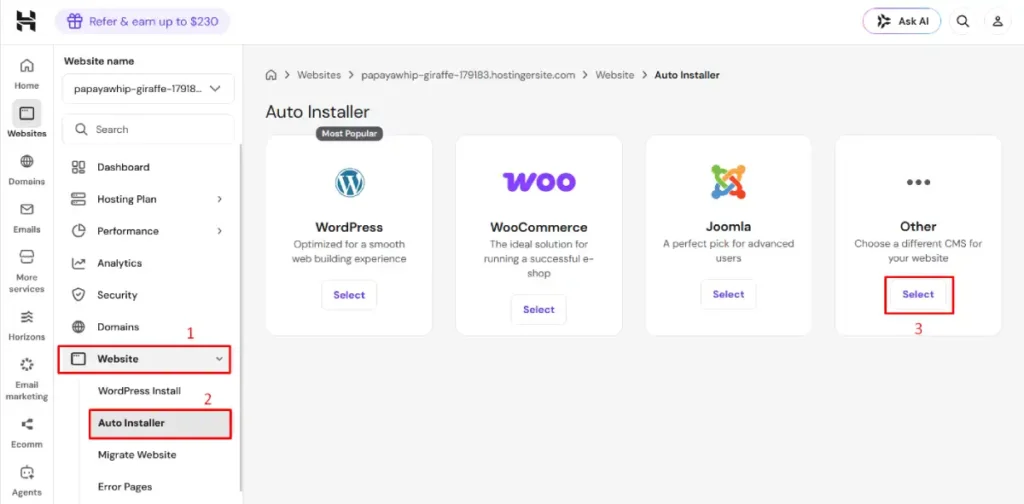
- Once the site is ready, you land in that specific website’s own dashboard, distinct from your main hPanel
- In the left sidebar, go to Website, then Auto Installer
- Four options appear as cards: WordPress, WooCommerce, Joomla, and Other
- Click Select under Other, since OpenCart is not one of the three featured applications
Step 5: Search for OpenCart.
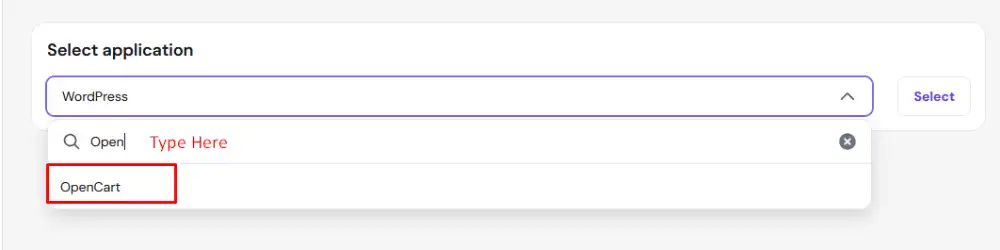
- A Select application dropdown opens
- Type Open into the search field
- OpenCart appears as a result beneath it
Step 6: Select and confirm.
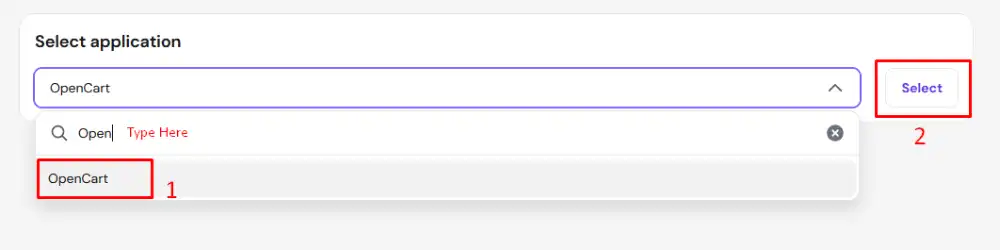
- Click OpenCart from the list
- Confirm it now shows in the dropdown field
- Click the Select button to its right
Step 7: Enter your store’s credentials.
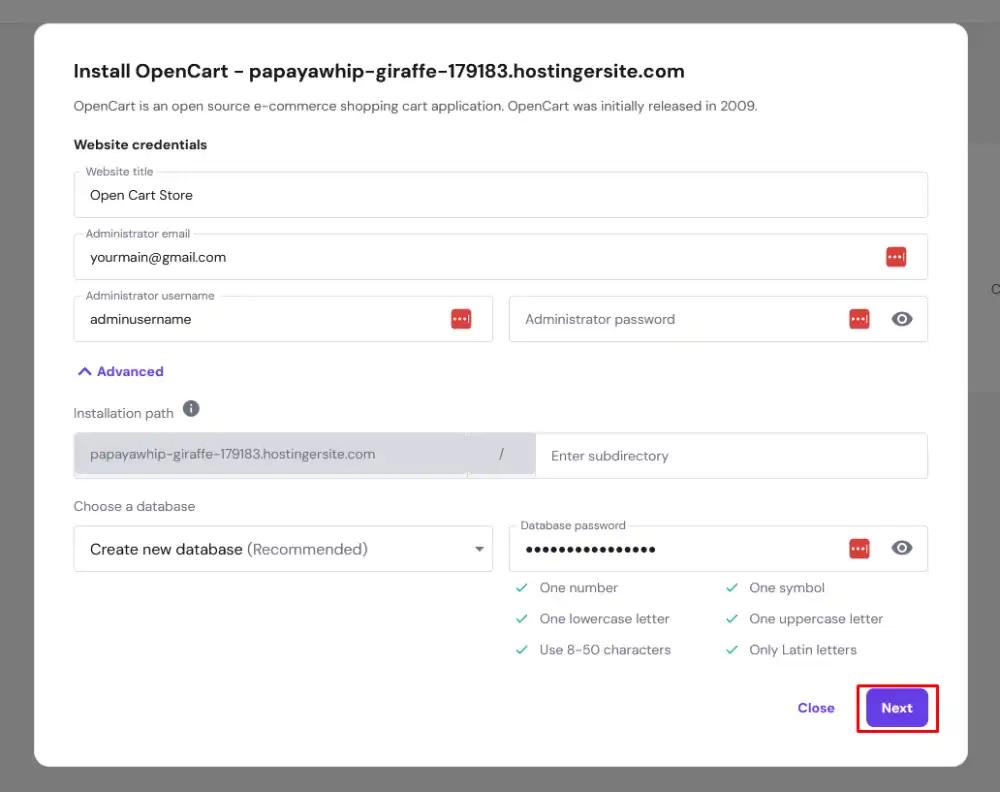
- An Install OpenCart form opens
- Fill in Website title, your store’s name
- Fill in Administrator email
- Fill in Administrator username
- Fill in Administrator password
- Expand Advanced if it is not already open
- Confirm the Installation path, leave the subdirectory field blank to install at your domain root, or enter a subdirectory name to install in a subfolder
- Under Choose a database, leave it set to Create new database (Recommended), Hostinger generates the database and a strong database password automatically
- Click Next
Step 8: Confirm version and update settings.
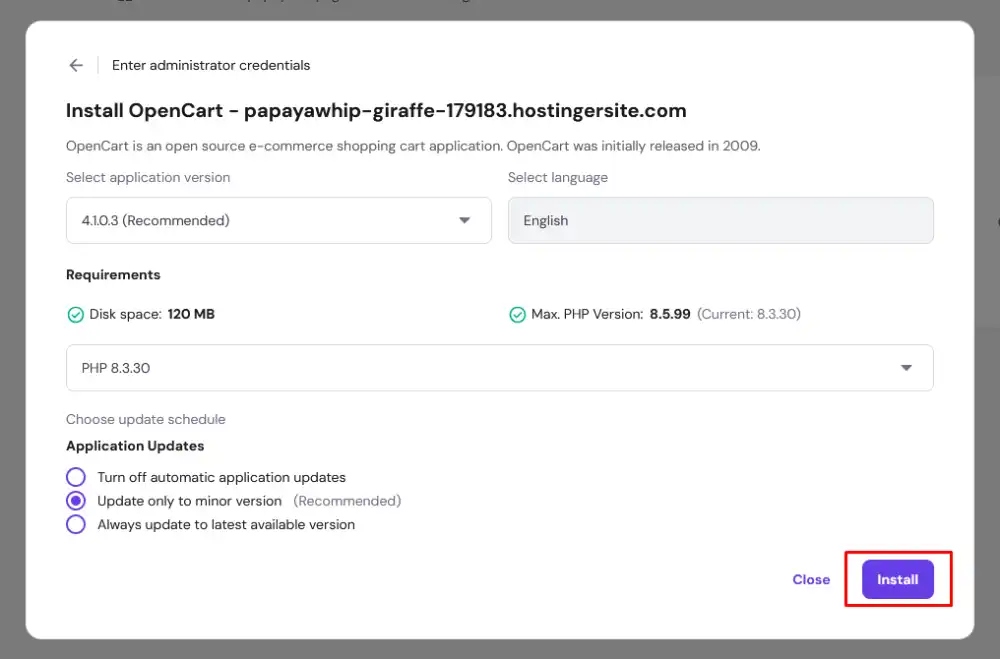
- The next screen shows Select application version, the current recommended OpenCart release
- Confirm Select language
- Review the Requirements check confirming your PHP version meets OpenCart’s minimum
- Under Choose update schedule, leave Update only to minor version selected, the safest default, it patches security issues without risking a major version jump breaking your store unexpectedly
- Click Install
Step 9: Confirm the install succeeded.
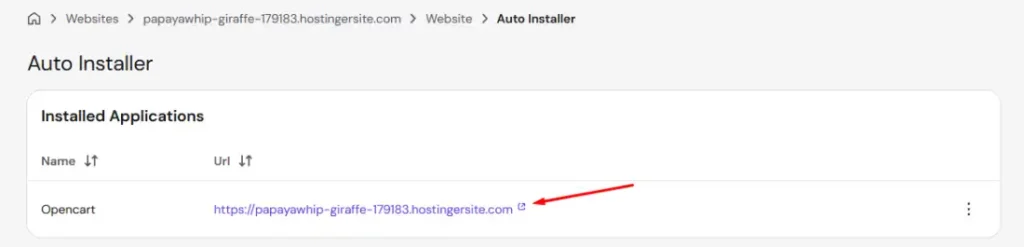
- Hostinger returns you to the Auto Installer page
- An Installed Applications table now shows OpenCart listed
- A clickable live URL appears next to it
Step 10: Visit your live store.

- Click the URL
- Your OpenCart store loads with its default demo catalog and theme
- Log into the admin panel and begin replacing the sample products with your own
The whole process, start to a live default store, takes under ten minutes and requires no manual database setup, Hostinger’s Auto Installer handles that step for you automatically.
The SEO URL Fix on Hostinger Specifically
Because Hostinger runs LiteSpeed rather than plain Apache, one detail is worth knowing:
LiteSpeed is a drop-in Apache replacement with full .htaccess support, so every step in the SEO URL fix chain above, renaming the file, confirming mod_rewrite, AllowOverride, RewriteBase, and the admin toggle, applies exactly as written.
You are not dealing with a different configuration system, LiteSpeed reads the same .htaccess file Apache would.
A Hostinger-Specific Performance Step Worth Adding
Hostinger’s LiteSpeed setup includes an official LiteSpeed Cache module built for OpenCart specifically, worth activating on top of the general performance steps below.
- In your OpenCart admin panel, go to Extensions, then Extension Installer (or Modules, depending on your version)
- Find LiteSpeed Cache in the list
- Click to activate it, then click Edit
- On the General tab, set LiteSpeed Cache Status to Enabled
- Review and save the remaining cache settings for your store
- Note that the module typically adds a few required lines to your .htaccess file automatically, if you customized your .htaccess manually during the SEO URL fix above, verify those additions did not conflict with your existing rules
Performance Configuration Beyond the Basics
Enable PHP OPcache
Confirm OPcache is enabled in your PHP configuration, most modern hosts include it by default, but verify directly rather than assume. This is one of the highest-impact, lowest-effort performance improvements available on any PHP-based platform, OpenCart included.
Optimize Images Before Upload
OpenCart does not aggressively compress product images automatically. Resize and compress images before uploading them to the catalog, rather than relying on the platform to handle it after the fact.
Enable Database Caching
Check your OpenCart admin’s cache settings and confirm caching is active for your storefront. A store running without cache enabled recalculates catalog data on every single page load, a real, avoidable performance cost.
What to Do After Setup: The Launch Checklist
A store that loads without errors is not the same as a store that is actually ready to sell. Work through this checklist before announcing the store publicly.
1. Secure the Admin Panel
- Change your admin login path from the default location, most tutorials skip this, and the default admin URL is one of the first things automated bots probe on any new OpenCart install
- In your admin folder, rename it to something non-obvious rather than leaving it at the default admin folder name
- Update your admin folder path in System, then Settings, then the relevant configuration file if your OpenCart version requires it, check your specific version’s documentation for the exact process
- Set a strong, unique admin password, not the one you used during installation testing
- Confirm two-factor authentication is enabled if your OpenCart version and installed extensions support it
2. Verify File Permissions Are Actually Correct
Revisit the permissions you set during installation. Config files should be restrictive (commonly 644), while the system/storage folder needs to remain writable. Loose permissions left over from troubleshooting during setup are a real, avoidable security gap.
3. Confirm HTTPS Is Fully Enforced
- Go to System, then Settings, then edit your store
- Under the Server tab, confirm both the storefront and admin panel are set to use SSL
- Visit your live store directly and check for a mixed-content warning in your browser, which indicates some resources are still loading over an insecure connection
- Fix any mixed-content sources before launch, this affects both security and how browsers display your store to visitors
4. Set Up Store Basics Before Testing Checkout
- Go to System, then Localisation, and confirm your default currency and any additional currencies you plan to support are configured correctly
- Set up your tax classes and rates under System, then Localisation, then Taxes, matching your actual legal requirements, not the installer’s defaults
- Configure at least one shipping method under Extensions, then Shipping, even a simple flat rate, so checkout has something to calculate against
- Install and configure at least one payment gateway under Extensions, then Payments, and enter real, live credentials, not test credentials, once you are ready to go live
5. Fix Email Delivery Before Launch, Not After
This is a common, easy-to-miss OpenCart gotcha. By default, OpenCart often relies on PHP’s built-in mail function to send order confirmations and password resets, which many hosts flag as spam or fail to deliver reliably.
- Go to System, then Settings, then edit your store, then the Mail tab
- Switch the mail engine from the default PHP mail option to SMTP
- Enter your SMTP credentials, using a transactional email service or your hosting provider’s SMTP details, rather than a generic email account
- Save, then send a real test order to confirm the confirmation email actually arrives, checking your spam folder the first time in case further sender reputation setup is needed
A store that silently fails to send order confirmations loses customer trust immediately, and this is not always obvious until a real customer complains.
6. Set Up Automated Backups
Confirm your host provides automated backups covering both your database and your files, and confirm the backup frequency actually matches how often your catalog and orders change. If your host does not offer this natively, set up a scheduled export yourself rather than assume it is happening. Test restoring from a backup at least once before you need it for real.
7. Run One Complete, Real Checkout
Place an actual order through your live store as a customer would: browse to a product, add it to the cart, apply a shipping method, complete payment with a real (or your gateway’s test) card, and confirm the order appears correctly in your admin panel with the confirmation email delivered. This single test catches more launch-day problems than any individual setting check above.
8. Submit Your Sitemap and Connect Search Console
- Confirm your OpenCart sitemap is accessible, typically through the Google Sitemap extension if not already active
- Add your property in Google Search Console
- Submit your sitemap URL there
- This does not happen automatically, and skipping it delays how quickly your store gets indexed after launch
OpenCart Hosting Questions Answered
What PHP version does OpenCart need?
PHP 7.4 or higher is the minimum for current OpenCart 4.x releases, with 8.1 recommended. Confirm your specific OpenCart version’s exact requirement before choosing hosting, since minimum supported versions shift between releases.
Why do I get a 404 error after enabling SEO URLs on OpenCart?
Almost always one of five specific causes: the htaccess file not renamed from htaccess.txt, mod_rewrite not enabled, AllowOverride not set to All in the server configuration, an incorrect RewriteBase path, or the admin panel toggle not actually saved. Check all five in order.
Does OpenCart work on Nginx hosting?
Not with the standard .htaccess configuration, since Nginx does not read .htaccess files. Nginx requires equivalent rewrite rules configured directly in the server block instead, a different setup process than the Apache-based instructions most tutorials cover.
Is shared hosting good enough for OpenCart?
For a small catalog during testing, yes. For a real store with meaningful traffic, a host offering VPS-level or configuration-level access is worth it specifically because it lets you directly fix issues like the SEO URL 404 problem yourself rather than depending on a support ticket.
How much memory does OpenCart need?
128M is the functional minimum, 256M or higher is recommended for a smoother experience, particularly on stores with a larger catalog or heavier extension use.
Why is my OpenCart store slow even on good hosting?
Usually PHP OPcache not being enabled, or unoptimized product images uploaded at full size. Both are configuration fixes rather than hosting upgrades, confirm OPcache status with your host and compress images before uploading rather than after.
Why aren’t my OpenCart order confirmation emails arriving?
Usually because the store is still using PHP’s default mail function instead of SMTP. Switch to SMTP under Settings, then the Mail tab, and enter real SMTP credentials from your host or a transactional email service, then run a real test order to confirm delivery.
What should I check before launching an OpenCart store publicly?
Secure the admin panel and rename its default path, confirm HTTPS is fully enforced with no mixed content, switch email to SMTP, set up automated backups, and run one complete real checkout end to end. A working store is not automatically a store ready to sell.