
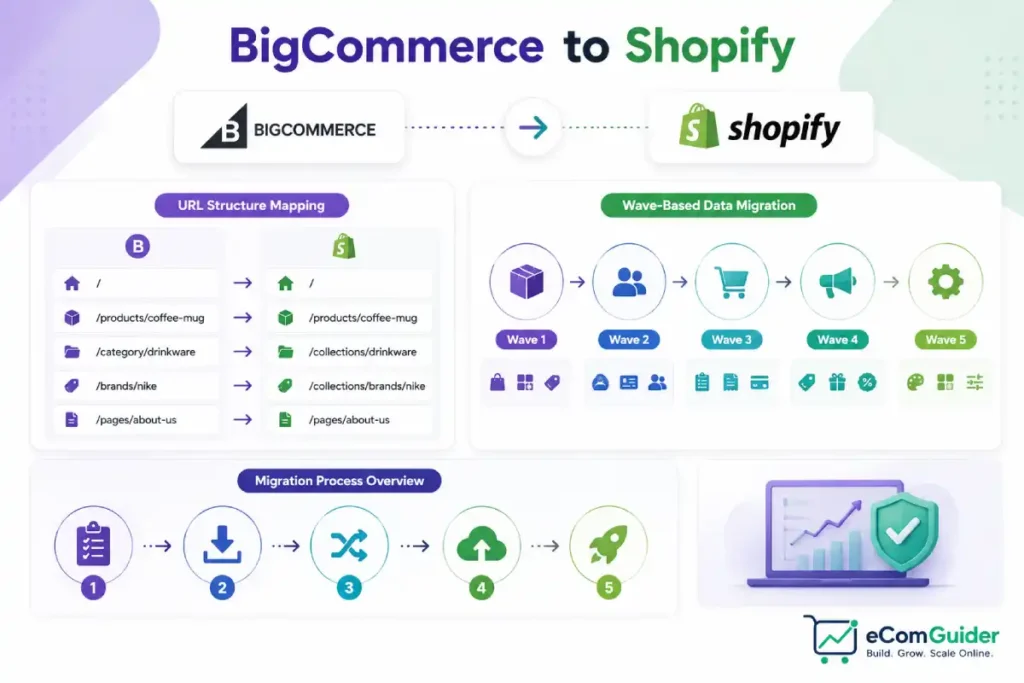
BigCommerce product URLs look like yourstore.com/product-name. Shopify’s look like yourstore.com/products/handle.
That one structural difference, multiplied across every product, category, and blog post you have, is where most of the real risk in this migration actually lives, not in the data transfer itself.
Get the redirect mapping wrong and organic traffic can drop by half within weeks.
Get it right, along with the rest of the process below, and this is one of the more manageable platform-to-platform migrations, since both platforms are closed, hosted systems with fairly comparable data structures.
This guide walks through every step in order, nothing skipped.
Key Takeaways
- Shopify’s 3-variant-option limit is not shared by BigCommerce. BigCommerce supports more flexible option types natively, some products will need real restructuring specifically because of Shopify’s constraint, not a limitation both platforms have in common.
- Whether order history requires manual CSV conversion depends on your tool. Matrixify’s workflow involves this manual step, but API-based services like Cart2Cart and LitExtension can automate more of the process.
- Customer passwords cannot migrate from BigCommerce to Shopify specifically. This is a real limitation for this particular pairing, not a universal rule true of every platform migration.
- Manual and Matrixify migration is a truly different workflow from using a fully automated migration service. This guide covers both separately rather than blending steps meant for one into a walkthrough meant for the other.
- Migrating in waves and connecting Shopify Payments early are both good practices, not official requirements. Present them as recommendations you can adapt, not a fixed sequence Shopify mandates.
What Actually Differs Between the Two Platforms
For the broader picture beyond migration mechanics, BigCommerce vs Shopify covers the full comparison, the differences below are specifically the ones that affect a real migration.
On BigCommerce
- More flexible product option types, checkboxes, text fields, file uploads, date pickers, beyond what Shopify’s native variant system supports
- Manufacturers, a dedicated field with no single default Shopify equivalent, depending on your migration tool this commonly becomes a vendor field, a metafield, or a product tag
- Native blog functionality, with no direct Shopify import path, migrating this content requires a dedicated tool or manual work
On Shopify
- A hard 3-variant-option limit per product, this is a real, specific constraint BigCommerce sellers with more complex option structures need to plan around directly
- No native product reviews built into Shopify’s own core, though the wider app ecosystem, Judge.me, Loox, and Yotpo among others, covers this widely, the gap is in Shopify’s own native functionality, not the platform’s overall capability
- Fixed prefixes in product and collection URLs that cannot be removed
Choosing Your Migration Method
This is the real fork point, and picking one path clearly avoids mixing steps meant for a different method.
| Method | Best For | Real Trade-off |
|---|---|---|
| Manual CSV export and import | Small catalogs, comfortable reformatting CSV columns yourself | Free, but you manually handle all field mapping and order history conversion |
| Matrixify | Most real migrations, mid-sized to large catalogs | Automates redirect generation from old BigCommerce URLs, still involves a manual CSV export and template conversion step for order history specifically |
| Cart2Cart or LitExtension | Larger or more complex catalogs, less manual CSV work desired | API-based processes can automate more of the transfer, including order history, without the manual template conversion Matrixify requires |
| Specialist migration agency | Large or complex catalogs, no internal technical capacity | Highest cost, lowest personal effort |
The Pre-Migration Checklist
- Back up everything from BigCommerce. Products, customers, orders, images, and any custom files, before touching a single setting.
- Audit your current data. Review products, customers, orders, pages, blog content, and custom fields, this tells you what actually needs to move versus what can be left behind.
- Document your category and URL structure. This is what your redirect map gets built from later, and it is far easier to capture now than reconstruct after the fact.
- Export your full BigCommerce URL list. Use a crawler tool or your sitemap to get every live URL, not just the ones you remember.
- List every BigCommerce app and integration you rely on. Not all of them have a direct Shopify equivalent, note the actual function each one serves so you can find the right replacement, not just a similarly named app.
- Note your tracking pixels and email integrations specifically. These are commonly forgotten until a marketing campaign breaks post-launch.
- Decide how much order history actually needs to move. Many merchants migrate only recent orders rather than a full historical archive, decide this deliberately rather than defaulting to everything.
Method A: Manual CSV or Matrixify Migration
Follow this path completely if you chose manual migration or Matrixify. Do not mix in steps meant for a fully automated service in Method B.
A1: Set Up Your Shopify Development Store (Shopify)
- Create a Shopify development store, free and unlimited through the Partners program, or start a trial
- Choose your starting theme, Dawn works for testing, most serious launches use a paid theme or custom build
- Configure store basics: currency, tax zones, shipping zones, and customer account settings
A2: Export Your Products (BigCommerce)
- Go to Products, then Export Products
- Download the full catalog as CSV
A3: Export Your Customers (BigCommerce)
- Go to Customers, then Export
- Download the customer list as CSV
A4: Export Your Orders (BigCommerce)
- Go to Orders, then use the export function
- Download the order history you decided to migrate in your pre-migration checklist, as CSV
- This file will need manual reformatting to match Matrixify’s or Shopify’s expected template
A5: Reformat Your Product Data (Planning)
- Match your exported columns to Shopify’s expected CSV structure
- Confirm variant options fit within Shopify’s 3-option limit, consolidating BigCommerce’s additional option types first if your catalog uses more, this is where real restructuring work happens
- Map BigCommerce’s meta title and description fields into Shopify’s SEO title and description fields
- Map your Manufacturers field to whichever destination fits your setup, a vendor field, a metafield, or a product tag, depending on how you plan to use this data on Shopify
A6: Migrate Products in a Wave (Shopify)
Migrating in stages with verification between each is a recommended practice, not a Shopify requirement, adapt this to fit your own workflow.
- Import your reformatted product CSV through Shopify’s built-in importer or Matrixify
- Spot-check a real sample of products against your original BigCommerce catalog
- Verify variants, prices, SKUs, images, and inventory counts specifically
- Confirm results before proceeding to customers and orders
A7: Migrate Customers in a Wave (Shopify)
- Import your customer CSV
- Verify a real sample of customer records, checking that billing and shipping addresses formatted correctly
- Customer passwords cannot migrate from BigCommerce to Shopify, plan a password reset communication for launch
A8: Migrate Orders in a Wave (Shopify)
- Convert your exported BigCommerce order CSV to match your chosen tool’s import template, this manual conversion step applies specifically to Matrixify’s workflow
- Import order history, these typically land as archived records rather than active orders
- Verify line items, order totals, and customer associations match your original BigCommerce data on a real sample
A9: Migrate Blog Content (Shopify)
BigCommerce blog content has no native Shopify import path.
- Use Matrixify, a dedicated migration tool, or manual copy-paste depending on your catalog size and content volume
- Check that internal links inside migrated posts still work correctly, or update them to the new URL structure
Method B: Fully Automated Migration Service
Follow this path completely if you chose Cart2Cart, LitExtension, or a specialist agency. Do not mix in manual CSV steps from Method A.
B1: Set Up Your Shopify Store (Shopify)
- Create your Shopify account and select a plan
- Choose a starting theme, your migration service typically will not transfer BigCommerce’s design
B2: Configure and Run Your Migration Service (Migration Service)
- Connect your BigCommerce and Shopify stores through your chosen service
- Select the entities to migrate: products, customers, and orders, including how much order history based on your pre-migration decision
- Confirm directly whether your service handles blog content, reviews, and Manufacturers field mapping, coverage varies by provider
- Run a demo migration if available, reviewing results before committing to a full run
B3: Verify the Results (Both Platforms)
- Cross-check migrated product, customer, and order counts against your original BigCommerce numbers
- Spot-check a real sample of each entity type for accuracy
- Customer passwords still cannot migrate through this method either, plan a password reset communication regardless of which service you used
Both Methods Converge Here
Replace BigCommerce Apps and Integrations (Shopify)
- Using the app and integration list from your pre-migration checklist, find and install the corresponding Shopify app for each function
- Reconnect tracking pixels and email marketing integrations specifically
- Test each integration individually
Rebuild Your Storefront Design (Shopify)
- Customize your chosen theme to match your brand, navigation, and page layouts
- Rebuild any custom functionality your BigCommerce theme or apps previously handled
Set Up Your Redirect Map (Shopify)
- Using your exported BigCommerce URL list, map every old URL to its closest new Shopify equivalent, some merchants preserve their original product handles during migration, others intentionally rename products, plan your mapping around your own actual choice rather than assuming a fixed pattern
- Map category and collection URLs, blog post URLs, and any custom page URLs the same way
- If using Matrixify, use its redirect generation feature to automate much of this mapping directly from your BigCommerce export
- Set up 301 redirects for every mapped URL
Configure Payments (Shopify)
- Set up Shopify Payments or your preferred payment gateway as part of your pre-launch checklist, this does not need to happen at the very start of the migration, Shopify’s own recommended sequence handles this closer to launch, after products, shipping, and taxes are configured
- Confirm test transactions process correctly before going live
Test the Full Storefront (Both Platforms)
- Place a real test order, confirming payment processing, order confirmation, and email delivery all work
- Test a representative sample of redirects directly in a browser, not just the homepage
- Confirm tracking pixels are firing correctly on key pages, product views, add to cart, and checkout
Go Live (Both Platforms)
- Update your domain’s DNS to point to Shopify
- Keep your BigCommerce store accessible on a temporary URL for a defined rollback window
- Monitor Google Search Console closely for the first two to four weeks, watching specifically for redirect errors or unexpected drops in indexed pages
Why the Redirect Map Matters This Much
Incorrect redirects during a platform migration can significantly reduce organic traffic and search visibility, this is a real, well-established risk in any platform migration, not a theoretical concern. The wave-based testing approach in the steps above exists specifically to catch mapping problems before they compound into a real, sustained ranking loss.
Real Migration Timeline
These are typical estimates. Actual timelines depend heavily on ERP integrations, custom apps, theme rebuild scope, and QA depth.
| Store Size | Typical Data Migration and Waves | Typical Design, Testing, and Launch | Total |
|---|---|---|---|
| Under 500 products | A few days | 1 to 2 weeks | Roughly 2 to 3 weeks |
| 500 to 5,000 products | 1 to 2 weeks | 2 to 4 weeks | Roughly 1 to 2 months |
| 5,000+ products, many integrations | 2+ weeks | 4+ weeks | 2+ months |
FAQ for BigCommerce to Shopify Migration
Do BigCommerce and Shopify use the same URL structure?
No. BigCommerce commonly uses a format like yourstore.com/product-name, while Shopify uses yourstore.com/products/handle. Every URL needs an explicit redirect mapped from the old structure to the new one, nothing maps automatically.
Does order history migrate automatically to Shopify?
Not fully, even with a migration tool. Order history still needs to be exported as a CSV file from BigCommerce and manually converted to match your chosen tool’s import template before it imports correctly.
How many product variants does Shopify support?
Up to 3 variant options per product, commonly color, size, and material. If your BigCommerce catalog uses more than 3 attributes per product, consolidate them before migrating rather than after.
What happens if I get the redirect mapping wrong?
Organic traffic can drop by roughly 50 percent within weeks in measured real cases. This is the single highest-risk part of the migration, worth more testing time than any other step.
Can I migrate everything at once instead of in waves?
You can, but it is not recommended. Migrating products, then customers, then orders, then content in separate waves with spot-checks at each stage catches mapping errors before they compound, rather than discovering them all at once after a full transfer.
Do I need a new theme, or can I reuse my BigCommerce design?
You need a new Shopify theme. There is no direct BigCommerce-to-Shopify theme import. Dawn, Shopify’s free default, works for testing, but most serious launches use a paid theme or a custom Liquid build.