
Setting up Shopify takes one to two days for a basic store and three to five days for a fully configured store with products, custom domain, and tested checkout. The advantage over other platforms is that you do not need to choose or configure hosting. Shopify handles servers, SSL, security, and software updates automatically. Your job is to follow the setup steps in order and configure the settings correctly.
This shopify setup guide covers every single step from creating your account to going live, with exact navigation paths for each setting and explanations of the choices that matter most for a new store.
✓ Pros
- ✓ Full-featured online store with unlimited products
- ✓ World’s best-converting checkout experience
- ✓ Multiple sales channels including social media and marketplaces
- ✓ Robust analytics and marketing automation tools
- ✓ 24/7 live chat support and extensive app integrations
✗ Cons
- ✗ Transaction fees apply unless using Shopify Payments
- ✗ Advanced features can be costly for small businesses
- ✗ POS Pro requires additional monthly fees
- ✗ Customization requires “Liquid” coding knowledge
- ✗ App costs can stack up quickly for advanced features
- ✗ Blogging tools are basic compared to WordPress
- ✗ Difficult to export data if you leave the platform
Table of Contents
Shopify Setup Guide Step 1: Create Your Account and Choose a Plan
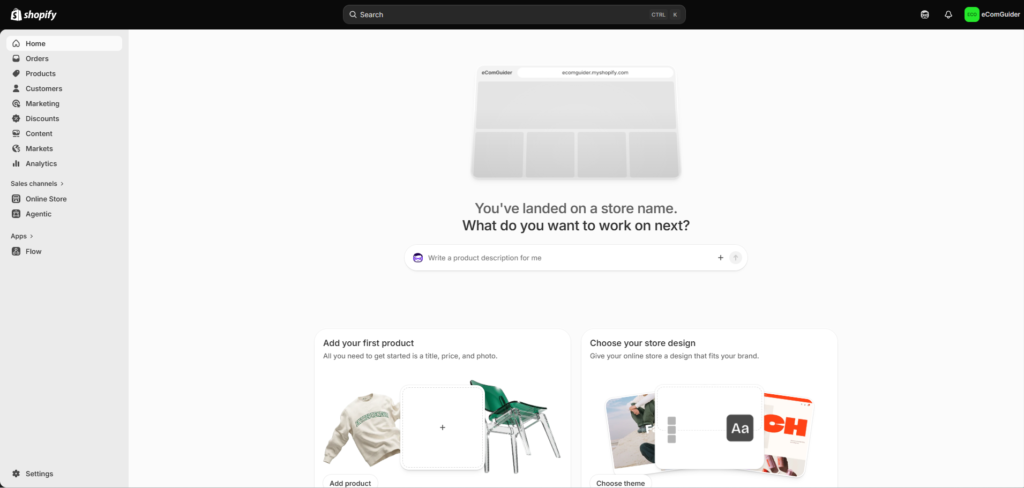
Go to shopify.com and click Start free trial. You get a three-day free trial with no credit card required. After the trial, Shopify offers new merchants their first three months for $1 per month on the Basic, Grow, and Advanced plans. This gives you plenty of time to build and test your store before paying full price.
What to enter during signup:
- Email address
- A store name. This becomes your default myshopify.com URL (for example, yourstorename.myshopify.com). You cannot change this later, so pick something clean and brand-aligned. You will connect a custom domain in a later step, so this backend URL is rarely visible to customers.
- Password
After signup you answer a few questions about your business. These help Shopify recommend features. Answer them accurately but do not overthink them. You can change your answers later.
Which plan to choose:
If you are just starting out, begin on Basic ($39/month, or $29/month on annual billing). It includes everything you need to launch a working store. You can upgrade to Grow or Advanced later when the economics justify it.
For a full breakdown of what each plan costs at different revenue levels, see the Shopify Pricing Guide.
Shopify Setup Guide Step 2: Configure Your Store Settings
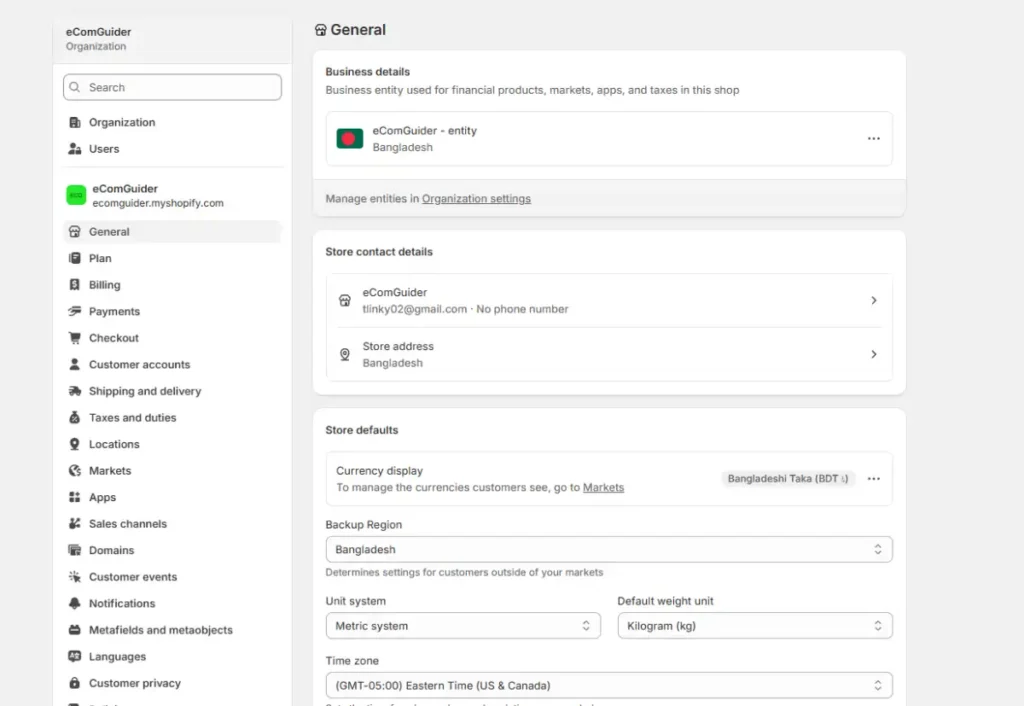
Before customizing your store design or launching products, configure the core settings that control how your store operates.
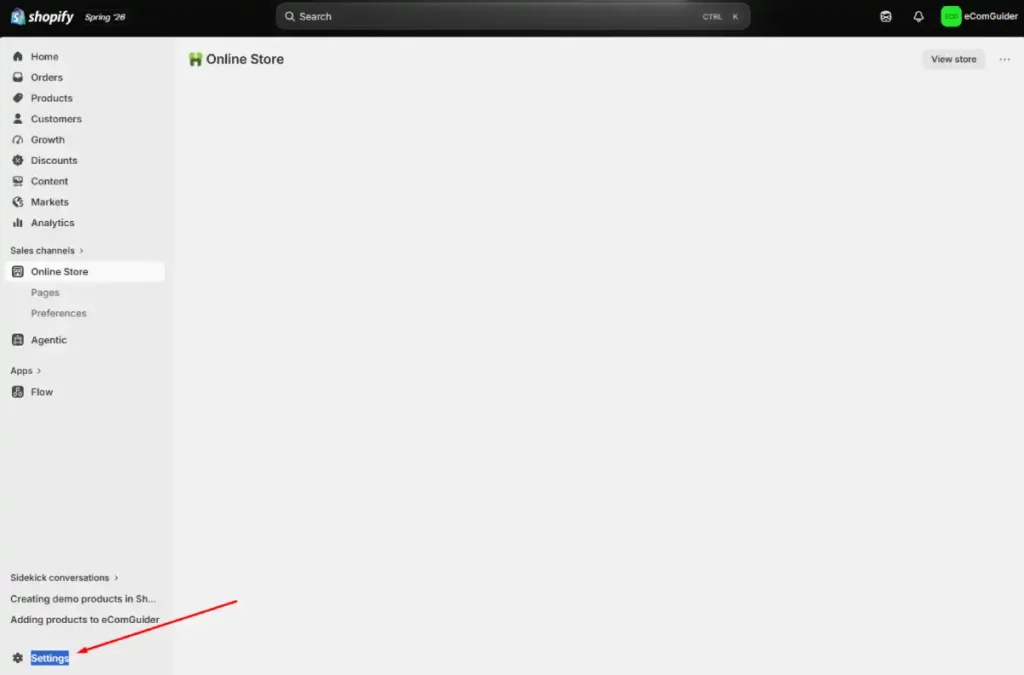
From your Shopify dashboard, click Settings in the bottom-left corner of the admin panel.
Work through the following sections:
Store Details
Settings → Store details
Add:
- Store name
- Legal business name (if applicable)
- Business address
- Contact email
Your business address is used for taxes, shipping calculations, and invoices. Your contact email receives Shopify notifications and customer-related alerts.
Billing
Settings → Billing
Add a payment method for your Shopify subscription.
You can use:
- Credit card
- Debit card
- PayPal (where supported)
Plan
Settings → Plan
Review your current Shopify plan.
Most new stores can start with the Basic Shopify plan and upgrade later as sales grow.
Shopify Setup Guide Step 3: Add Your First Product
Products are the foundation of your store. Shopify makes it easy to create products manually or import them in bulk.
Create a Product Manually
From the Shopify dashboard:
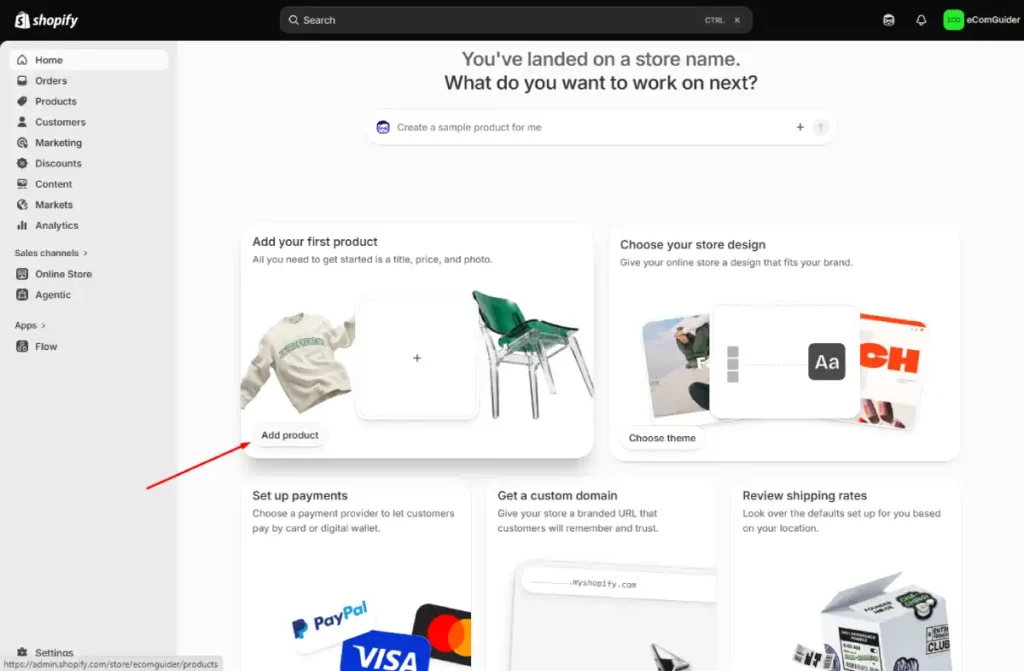
Products → Add product
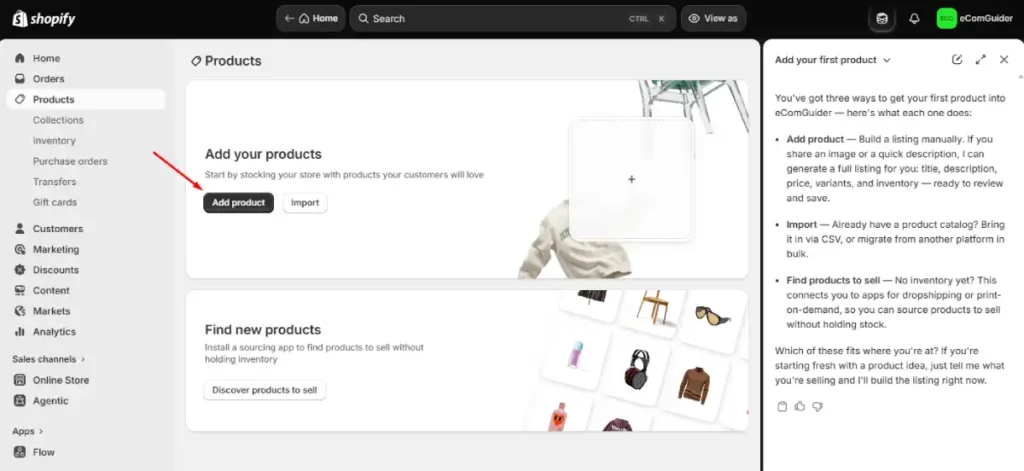
Or click Add product directly from the welcome dashboard.
Fill Out Product Information
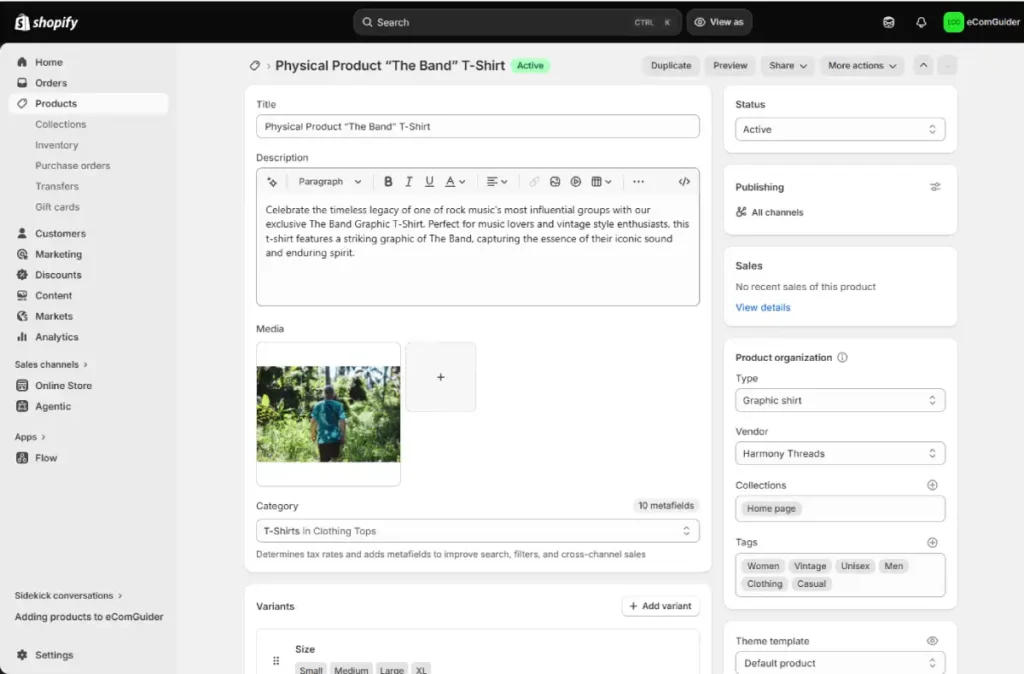
On the product editor page, complete:
Product Title
Use a clear product name.
Examples:
- Men’s Cotton T-Shirt
- Wireless Bluetooth Headphones
- Handmade Ceramic Mug
Product Description
Explain:
- Features
- Benefits
- Materials
- Dimensions
- Usage instructions
Write for customers first, then optimize for search engines.
Product Media
Upload:
- Product images
- Videos
- 3D models (optional)
High-quality images improve conversion rates significantly.
Product Category
Choose the most accurate category.
This helps Shopify:
- Calculate taxes correctly
- Improve product organization
- Generate relevant metafields
Pricing
Enter:
- Price
- Compare-at price (optional)
- Cost per item (optional)
You can also enable tax collection if required.
Organize Your Product
In the right sidebar, configure:
- Product status (Active or Draft)
- Vendor
- Product type
- Collections
- Tags
Proper organization improves filtering, navigation, and reporting later.
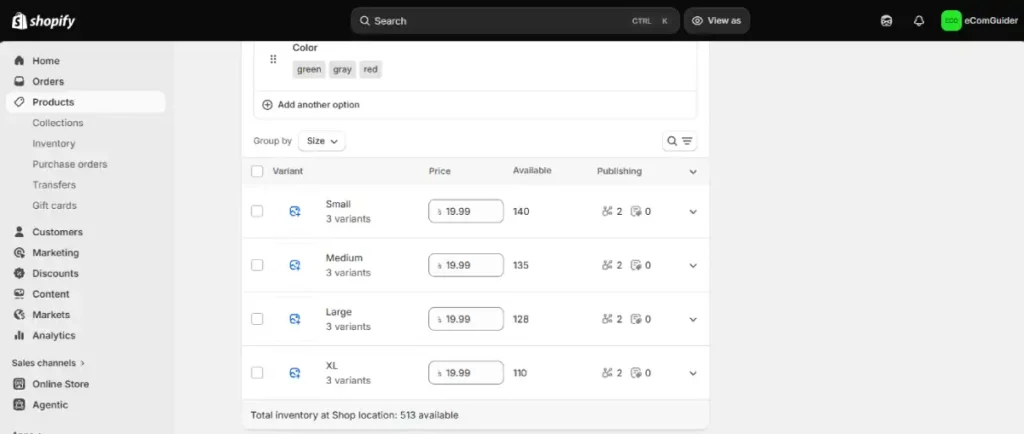
Add Product Variants
If your product comes in multiple sizes, colors, or styles, create variants.
Examples:
- Size: Small, Medium, Large, XL
- Color: Black, White, Blue
Under the Variants section:
- Click Add variant
- Add option names
- Add option values
- Set pricing and inventory
Shopify automatically generates all variant combinations.
Optimize Product SEO
Scroll down to Search engine listing and click Edit.
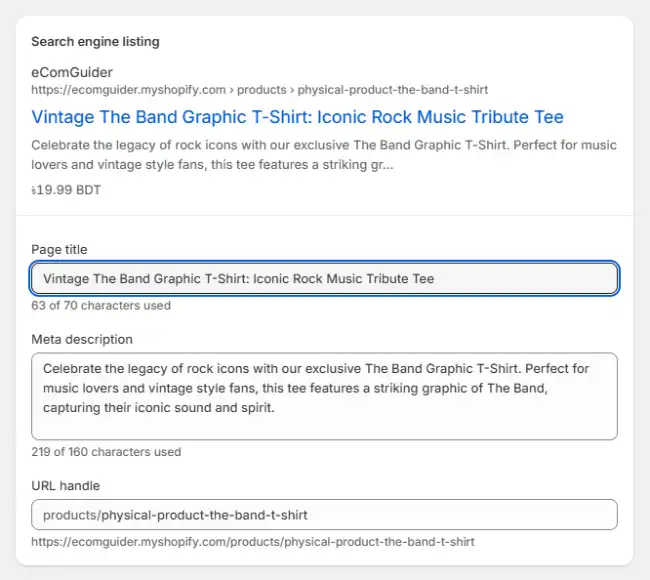
Complete:
Page Title
Include:
- Product name
- Important keyword
Example:
Men’s Cotton T-Shirt – Premium Soft Fit Tee
Meta Description
Write a concise summary that encourages clicks.
Example:
Shop our premium cotton t-shirt featuring a soft fit, breathable fabric, and everyday comfort.
URL Handle
Keep URLs:
- Short
- Readable
- Keyword-focused
Example:
/products/mens-cotton-tshirt
After completing all details, click Save.
Import Products in Bulk
Already have a catalog?
Go to:
Products → Import
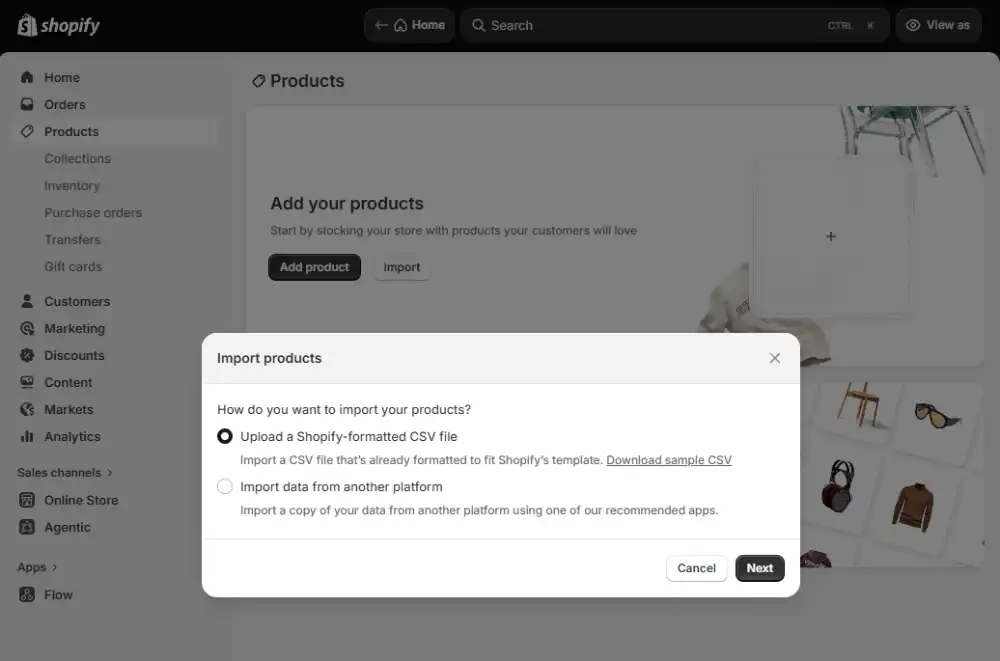
Shopify provides two options:
Upload a Shopify CSV File
Use this option if your product data already follows Shopify’s CSV format.
You can download Shopify’s sample CSV template and populate it with your products.
Import From Another Platform
Use Shopify’s recommended migration apps to import products from platforms such as:
- WooCommerce
- BigCommerce
- Etsy
- Magento
Bulk importing is much faster than manually creating hundreds of products.
Shopify Setup Guide Step 4: Publish Your Theme
After adding products, it’s time to activate your storefront design.
Go to:
Online Store → Themes
Shopify automatically installs a default theme such as Dawn.
Under Theme Library, locate your theme and click:
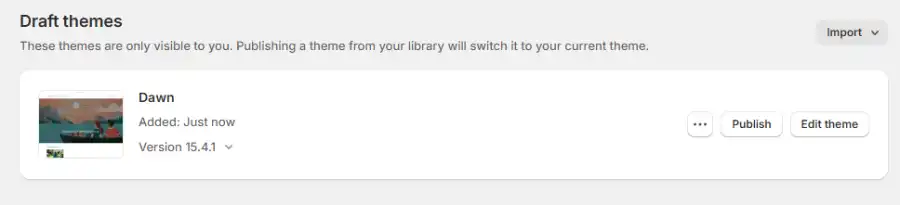
Publish
A confirmation popup appears asking whether you want to replace the current theme.
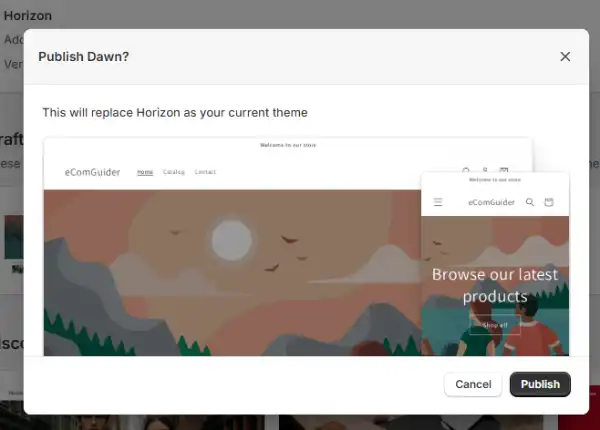
Click:
Publish
Your selected theme becomes the active storefront theme.
Shopify Setup Guide Step 5: Customize Your Theme
After publishing your theme:
Online Store → Themes → Customize
This opens Shopify’s visual theme editor.
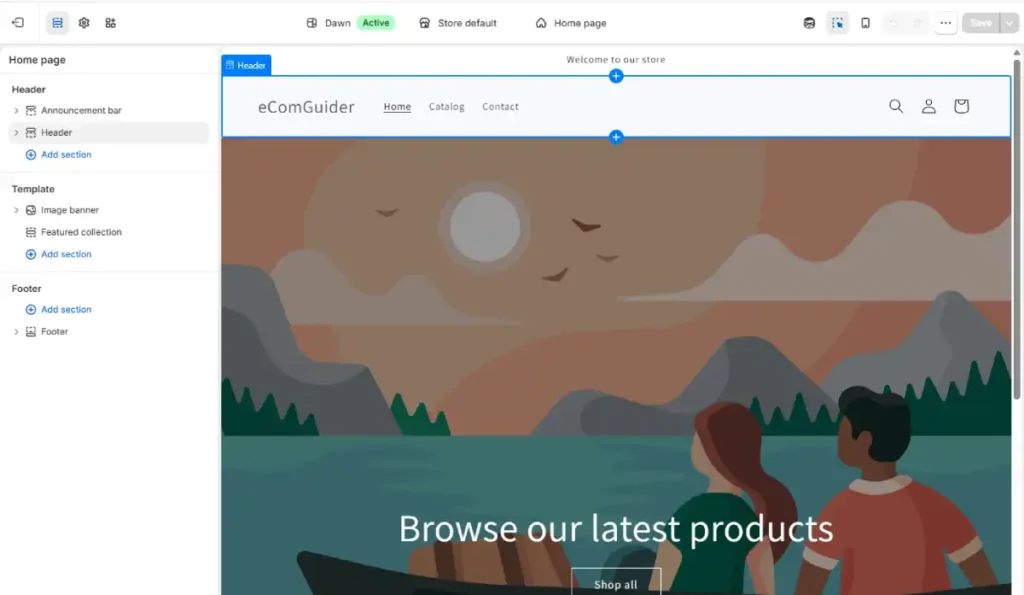
Upload Your Logo
Navigate to:
Header → Logo
Upload your store logo and adjust:
- Logo width
- Logo position
- Header layout
Configure Brand Colors
Go to:
Theme Settings → Colors
Set:
- Primary color
- Secondary color
- Accent color
- Button colors
Use consistent branding across your store.
Configure Typography
Go to:
Theme Settings → Typography
Choose:
- Heading font
- Body font
For best readability, use no more than two font families.
Customize Homepage Sections
Drag and reorder homepage sections.
Recommended structure:
- Hero Banner
- Featured Collection
- Featured Products
- Promotional Content
- Customer Testimonials
- Newsletter Signup
- Footer
Mobile Preview
Use Shopify’s preview controls to check how your store looks on:
- Desktop
- Tablet
- Mobile
Always test mobile layouts before launching.
Save Changes
Click Save after every major change.
Shopify Setup Guide Step 6: Configure Shipping and Delivery
Go to Settings > Shipping and delivery. Shipping is one of the areas where new store owners make the most mistakes, usually by leaving default settings that do not match their actual shipping costs.
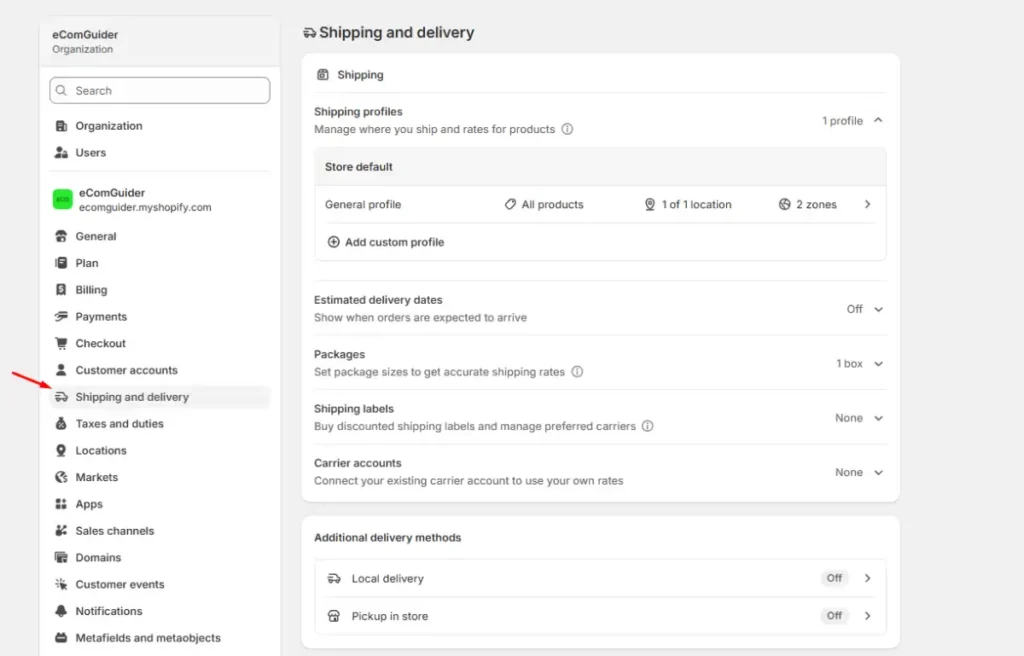
Step 6a: Create shipping profiles
Shopify uses shipping profiles to control which rates apply to which products. The General shipping profile applies to all products by default. You can create additional profiles for products with different shipping requirements (heavy items, fragile goods, digital products).
Step 6b: Set up shipping zones
Inside the General shipping profile, create zones for the regions you ship to. Click Create shipping zone, name it (for example, Domestic or United States), and add the countries or regions it covers.
Step 6c: Add shipping rates
Inside each zone, click Add rate. You have three main options:
- Flat rate: charges a fixed amount per order. For example, $5.99 for all domestic orders. Simple and predictable for customers.
- Free shipping: offers free shipping, either always or above a minimum order value. Setting a free shipping threshold (for example, free over $50) is one of the most effective ways to increase average order value.
- Carrier-calculated rates: shows customers the real carrier rate at checkout based on package weight and destination. Requires Advanced plan for all carriers, or Shopify Shipping for USPS, UPS, and DHL at discounted rates.
Step 6d: Set up Shopify Shipping (optional but recommended)
Shopify Shipping gives US and Canadian merchants discounted shipping rates and the ability to print labels from the Shopify admin. Go to Settings > Shipping and delivery and follow the prompt to set up Shopify Shipping. You can save up to 88% on USPS rates compared to retail post office prices.
For a comprehensive guide to configuring Shopify’s shipping settings, see the Shopify Shipping Guide.
Shopify Setup Guide Step 7: Configure Taxes
Go to Settings > Taxes and duties. Tax setup is simpler on Shopify than on WooCommerce because Shopify can automate calculations for you.
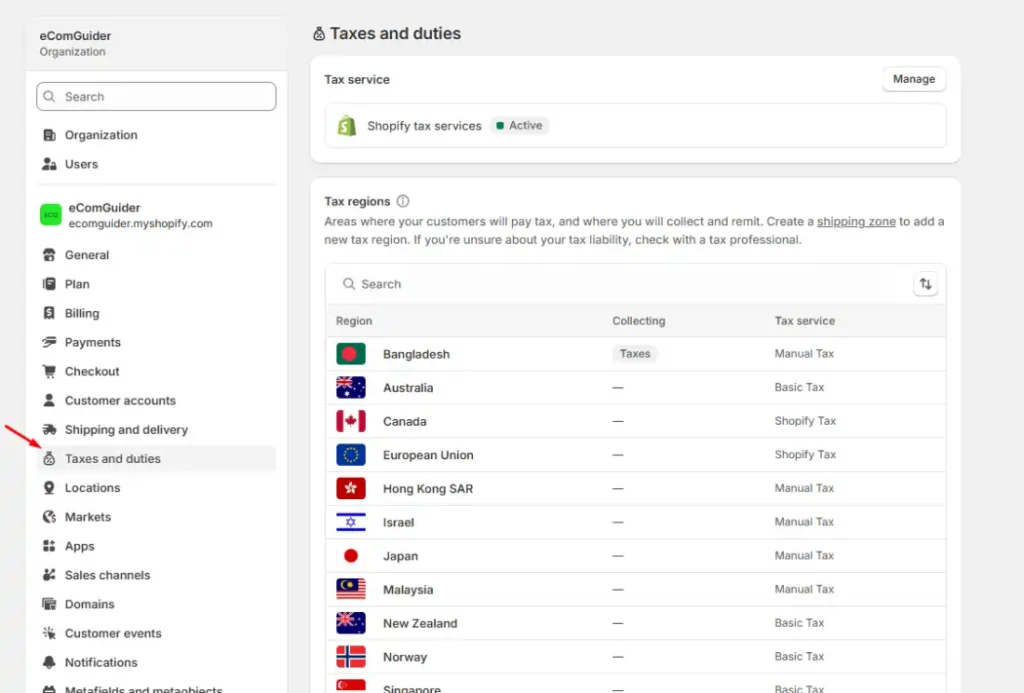
United States: Shopify automatically collects and tracks sales tax in US states based on your economic nexus. Under the United States section, confirm your store address is correct. Shopify calculates rates for each state automatically when you have nexus there.
You are responsible for knowing where you have nexus (based on sales volume or physical presence). Once you pass the threshold in a state (typically $100,000 in sales or 200 transactions), Shopify starts calculating tax on orders from that state.
Other countries: Under each country, click the edit icon to set whether prices include or exclude tax and whether to charge tax on shipping. For UK and EU stores, standard VAT applies. Check the Include tax in my prices box if you operate in a country where prices are displayed tax-inclusive (most of Europe).
Products exempt from tax: On individual product pages, scroll to the Shipping section and uncheck Charge taxes on this product for any items that are tax-exempt in your jurisdiction (such as certain food items, children’s clothing, or prescription items).
Shopify Setup Guide Step 8: Create Collections
Collections are your product categories. Customers use them to browse your store. Go to Products > Collections > Create collection.
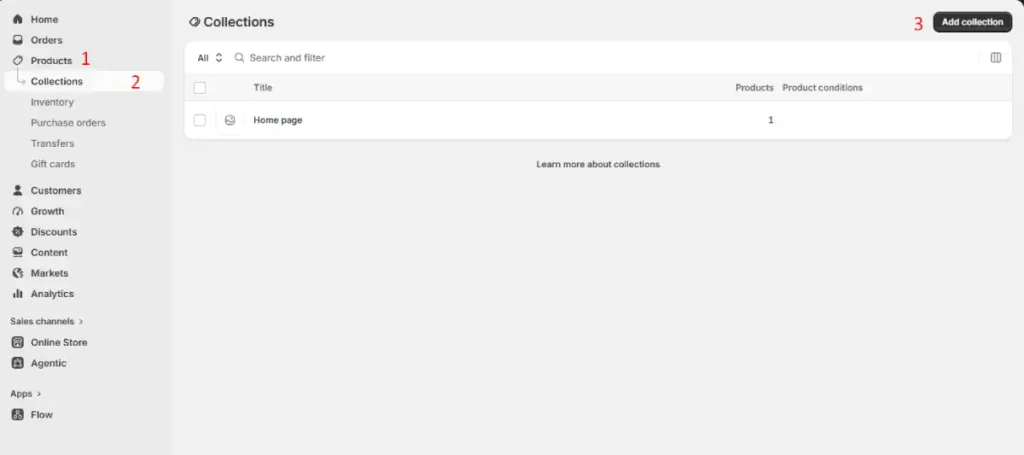
Manual collections: you add products individually.
Automated collections: Shopify adds products automatically based on conditions you set. For example: Tag is equal to summer-sale, or Price is greater than 50. This is the more practical option for stores with larger catalogues. Set your conditions and Shopify updates the collection automatically when products match.
For each collection, write a title and a description. The description appears on the collection page and helps with SEO. Upload a collection image.
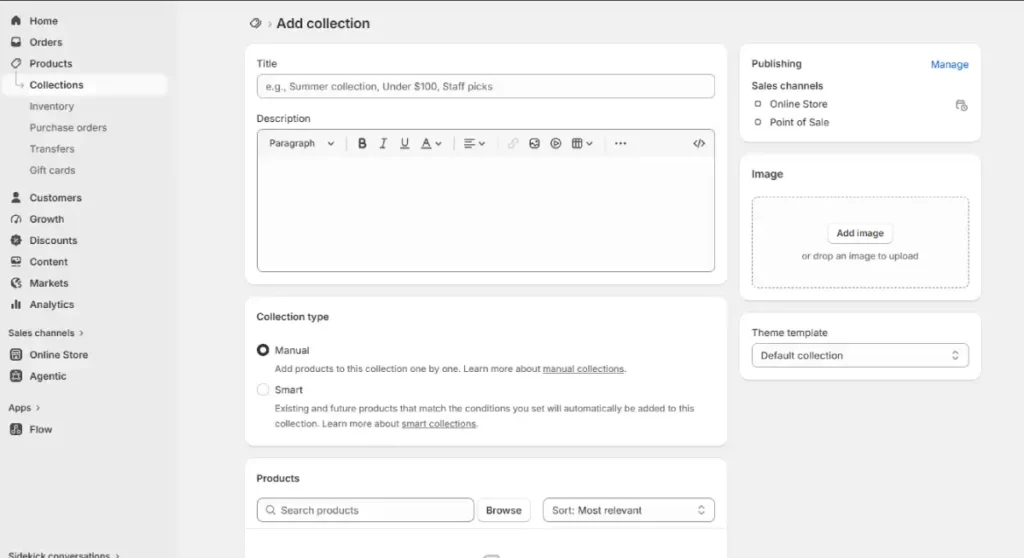
After creating collections, add them to your navigation in the next step.
Shopify Setup Guide Step 9: Build Your Navigation
Go to Online Store > Navigation. Navigation tells customers how to move around your store. Two menus exist by default: Main menu (the header navigation) and Footer menu.
Main menu: Click Main menu, then Add menu item. Search for your collections and add them. For a simple store, your main menu might contain: Shop (all products), a link to each main collection, About, and Contact.
Footer menu: Add links to your legal pages: Privacy Policy, Terms of Service, Refund Policy, and Contact.
Shopify creates legal page templates automatically. Go to Settings > Policies, click the template buttons to generate Privacy Policy, Refund Policy, Terms of Service, and Shipping Policy based on your store information. Edit each one to reflect your actual policies. Once saved, Shopify adds them to your footer automatically.
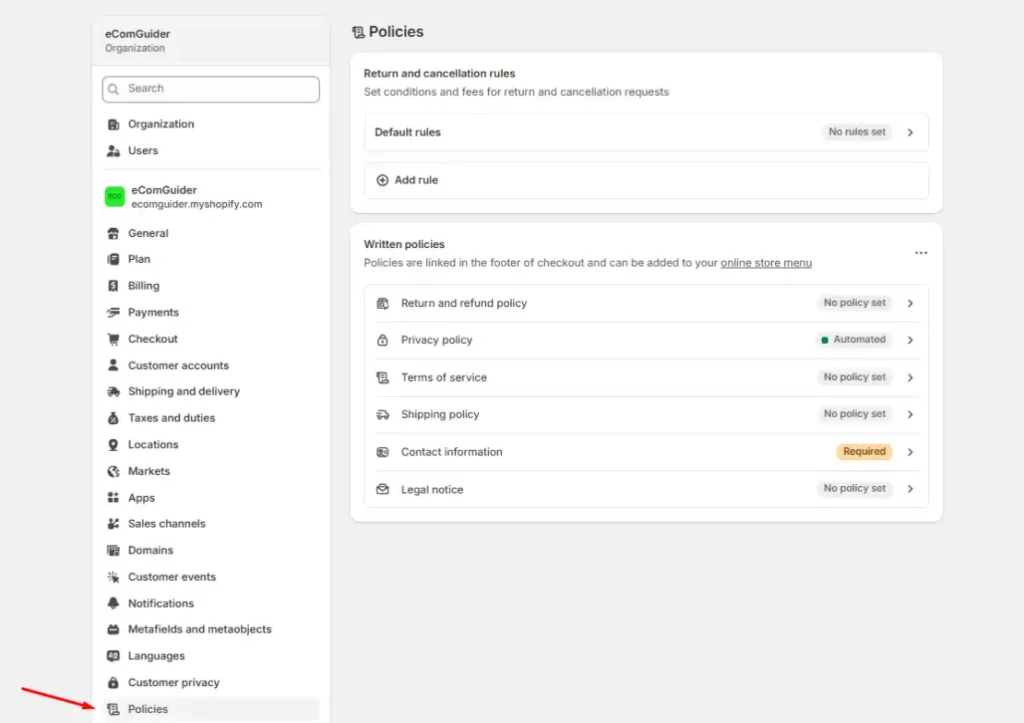
Shopify Setup Guide Step 10: Configure Email Notifications
Go to Settings > Notifications. Shopify sends transactional emails to customers automatically for order confirmations, shipping updates, and account actions. The defaults work, but you should customise them to match your brand.
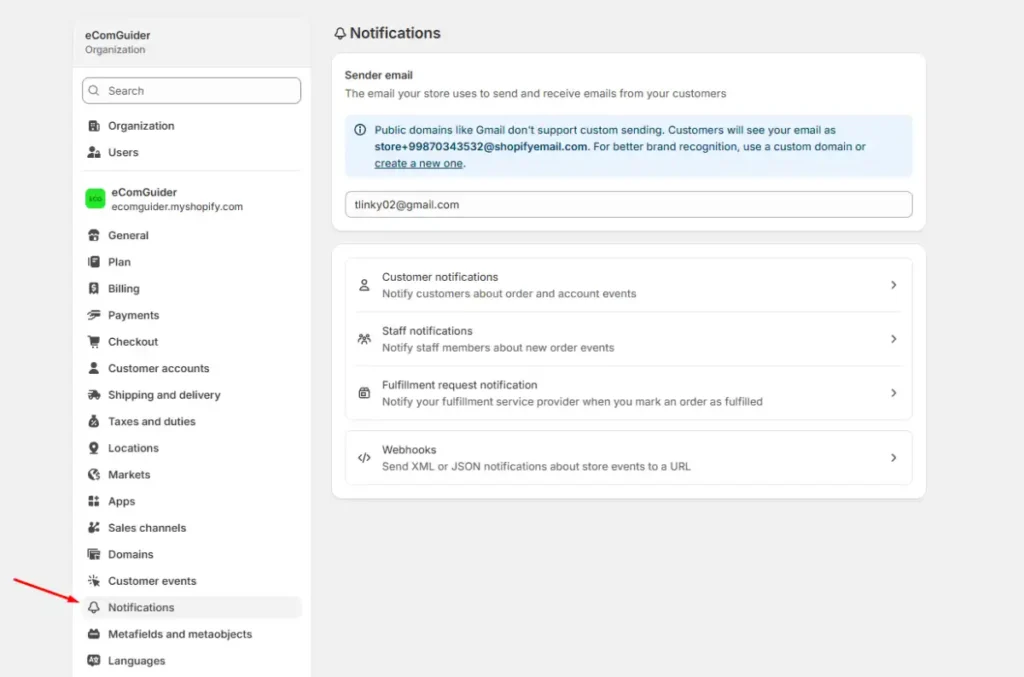
Sender email: Go to Settings > Store details and set your Sender email. This is the address customers see as the sender name. Use a domain-based email (orders@yourstorename.com) rather than a generic Gmail address. You can set up a free business email through Shopify Email Forwarding or Google Workspace.
Email templates: For each notification type (Order confirmation, Shipping confirmation, etc.), you can edit the subject line, preview text, and body content. At minimum, add your logo to the email header and update any placeholder text.
Shopify Setup Guide Step 11: Install Essential Apps
Go to Apps > Shopify App Store to find apps. Install only what you need at launch. Every app adds JavaScript to your store, which affects page load speed.
Reviews app: Customer reviews directly increase conversion rate. Judge.me offers a free plan that covers the core use case. Search for Judge.me in the App Store, install it, and follow the setup wizard to configure automatic review request emails after purchase.
Email marketing: Shopify Email is included in every plan and handles basic automations at no cost up to 10,000 emails per month. It covers welcome sequences, abandoned checkout emails (separate from the built-in recovery), and promotional campaigns. This is sufficient for new stores. As your list grows past 500 to 1,000 subscribers, Klaviyo’s paid plans provide significantly better segmentation and automation.
SEO: Shopify handles basic SEO (sitemaps, canonical tags, meta fields). For deeper SEO control, the SearchPie apps add content scoring and bulk editing tools. These are optional at launch but become useful as your product catalogue grows.
Page speed: Install TinyIMG or Crush.pics to automatically compress product images. Large uncompressed images are the most common cause of slow Shopify stores.
Shopify Setup Guide Step 12: Place a Test Order Before Going Live
Before you remove your store’s password and open to the public, place at least one test order going through the complete purchase process.
How to place a Shopify test order:
- Go to Settings > Payments
- Under Shopify Payments, click Manage
- Enable test mode
- Go to your storefront (click the eye icon at the top of the admin to preview it)
- Add a product to cart and go through checkout
- Use the test card number 4242 4242 4242 4242, any future expiry date, and any three-digit CVV
- Complete the purchase
Check that:
- The order appears in Orders in your admin
- An order confirmation email arrives in your inbox (not spam)
- The order details are correct: product, price, shipping, tax
- Inventory level decreased by one (if tracking is enabled)
Disable test mode after testing: return to Settings > Payments and turn off test mode.
Test on mobile too. Over 60% of ecommerce traffic comes from mobile devices. Go through the complete purchase flow on your phone to confirm the layout, button sizes, and checkout work correctly.
Shopify Setup Guide Step 13: Remove Password and Go Live
Your store is password-protected by default during setup, preventing anyone from accessing it while you build.
When you are ready to launch:
- Go to Online Store > Preferences
- Scroll to the Password protection section
- Uncheck Restrict access to visitors with the password
- Click Save
Your store is now live and publicly accessible.
Before doing this, run through this final checklist:
- All products have images, complete descriptions, and correct prices
- Shipping rates are configured for your primary markets
- Tax settings are correct for your jurisdiction
- Payment gateway is live (test mode disabled)
- Custom domain is connected and set as primary
- Legal pages (Privacy Policy, Terms of Service, Refund Policy) are published in your footer
- Mobile checkout works correctly
- Order confirmation emails arrive in inbox
Shopify Use Cases
Discover how Shopify supports different ecommerce business models, from physical products and dropshipping to print-on-demand, subscriptions, wholesale, digital products, and multichannel selling. Find out whether Shopify is the right platform for your specific business needs.
Startups
Perfect for early stage businesses looking to quickly launch an online store with minimal upfront investment. Shopify offers easy setup, customizable templates, and integrated payment processing to help startups get selling fast.
Enterprise
Scalable solution for large businesses requiring robust features, advanced analytics, and multi-channel selling capabilities. Shopify Plus provides high performance, dedicated support, and extensive customization to meet enterprise-level needs.
Agencies
Manage multiple clients’ stores with ease using Shopify’s comprehensive tools. Agencies can customize themes, optimize store performance, and leverage Shopify’s Partner Program to grow their service offerings efficiently.
Developers
API-first approach allows developers to build custom integrations, apps, and themes. Shopify’s extensive API documentation and developer tools empower developers to create tailored e-commerce solutions and enhance store functionality.
What to Do After Launch
Connect Google Analytics 4: Go to Online Store > Preferences and enter your GA4 Measurement ID. Enable Enhanced Ecommerce tracking so you see revenue, conversion rate, and product performance data in GA4.
Enable Shop Pay: If you have Shopify Payments enabled, Shop Pay is available by default. It lets returning customers from other Shopify stores check out in one tap using saved payment and shipping details. Over 200 million people have a Shop Pay account, and it significantly improves mobile conversion rate.
Set up abandoned checkout recovery: Go to Settings > Checkout and confirm that abandoned checkout emails are enabled. Shopify automatically sends a recovery email to customers who start checkout but do not complete it. This is included on all plans at no extra cost.
Add multichannel sales: Go to the Sales channels section in your admin sidebar. Add the channels relevant to your business: Facebook and Instagram, TikTok Shop, Google and YouTube. Each integration syncs your product catalogue and lets customers buy without leaving the platform.
For a full understanding of what Shopify costs as your store grows, including when it makes sense to upgrade plans, see Is Shopify Worth It. For a comparison of Shopify against WooCommerce at each revenue level, see Shopify vs WooCommerce.
Frequently Asked Questions
How long does Shopify setup take?
Most new stores take one to two days to complete all setup steps and go live. Adding a large product catalogue extends this. A store with 10 to 50 products, a custom domain, and tested checkout can typically be live in a single focused day. The steps that take the most time are adding product descriptions and images, and configuring shipping zones and rates correctly.
Do I need technical skills to set up Shopify?
No. The entire shopify setup guide requires no coding. Every step is done through the visual admin dashboard. Shopify was specifically designed for non-technical store owners. The only mildly technical step is updating DNS records when connecting a custom domain from an external registrar, and even that involves copying three fields from Shopify into your registrar’s settings.
What is the first thing I should do when setting up Shopify?
Complete your store settings before anything else: store address, billing, and Shopify Payments. These settings affect tax calculations, payment processing, and your subscription billing. Configuring them correctly at the start prevents having to correct orders and payments later. Many beginners skip to themes and products first, then encounter problems because their address and payment settings were not configured.
Should I use Shopify Payments or a third-party processor?
Use Shopify Payments if it is available in your country and your product category qualifies. It removes the transaction surcharge (2% on Basic, 1% on Grow, 0.6% on Advanced) that Shopify adds when you use a third-party processor. If Shopify Payments is not available to you, use Stripe or PayPal directly. At $5,000 per month in revenue on Basic, the 2% surcharge costs $100 per month. At $25,000 per month it costs $500 per month. That context makes the Shopify Payments decision straightforward for most stores.
How do I handle taxes on Shopify?
Go to Settings > Taxes and duties. For US stores, Shopify automatically calculates sales tax based on your store address and the customer’s location. You are responsible for registering with each state where you have tax nexus and filing returns. Shopify collects the tax and reports it; it does not file or remit on your behalf. For EU stores, set whether prices include or exclude VAT and configure the appropriate rates for each country where you have customers.
Can I change my Shopify plan later?
Yes. You can upgrade or downgrade your Shopify plan at any time from Settings > Plan. Upgrading takes effect immediately. Downgrading takes effect at the start of your next billing period. There is no penalty for switching plans. The main reason to upgrade is when the lower processing rate on the higher plan saves more than the extra subscription cost. At approximately $33,000 per month in revenue through Shopify Payments, upgrading from Basic to Grow pays for itself through lower processing fees.
What is the monthly cost for a new Shopify store?
A new store on Basic annual billing with Shopify Payments doing $5,000 per month in revenue pays approximately: $29 subscription, $160 in processing fees (at 2.9% + $0.30), $30 in essential apps, and $1 in domain renewal amortised monthly. Total: roughly $220 per month. As revenue grows, the processing fee portion grows with it while the subscription stays flat. For a full cost model at different revenue levels, see the Shopify Pricing Guide.
What to Read Next
To continue after completing this shopify setup guide, the full cost model at each revenue level is in the Shopify Pricing Guide.
For a revenue-based analysis of whether Shopify is worth its cost compared to WooCommerce, see Is Shopify Worth It.
For a detailed comparison of Shopify against WooCommerce on cost, SEO, and checkout, see Shopify vs WooCommerce.
For the complete guide to Shopify’s shipping settings and carrier options, see the Shopify Shipping Guide.
For Shopify’s official setup tutorial and step-by-step walkthrough, see the Shopify tutorial on the Shopify blog.
For Shopify’s official documentation on payments setup and Shopify Payments eligibility, see Shopify’s payments documentation.