
Switching WooCommerce hosting is not the same as switching hosting for a blog. A blog has posts and pages.
WooCommerce has those too, but it also has live orders, active subscriptions, customer sessions, payment gateway webhooks, and email configuration that can all break during a migration if you do not account for them.
Most WordPress migration guides skip these WooCommerce-specific problems entirely. They tell you to install a migration plugin, move your files, and point your domain at the new server. That process works for a blog.
For a WooCommerce store, it can result in missing orders, failed subscription renewals, and broken payment processing that you discover only after customers start complaining.
This guide covers how to switch WooCommerce hosting the right way, in the correct order, including the specific steps that other migration guides leave out.
Table of Contents
Key Takeaways
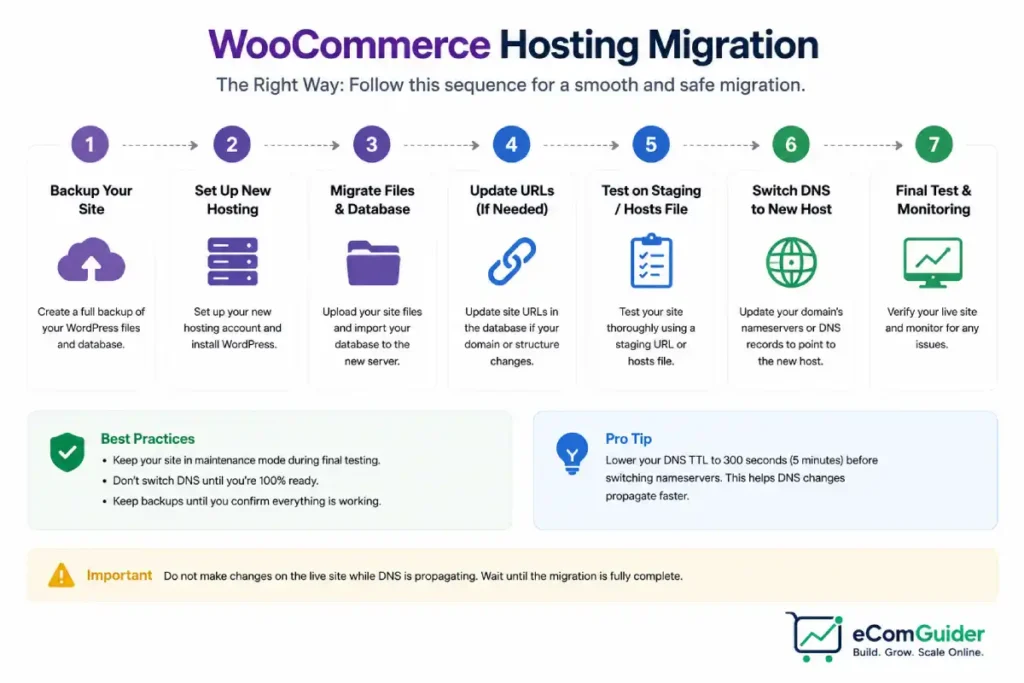
- Always migrate to the new host first, test everything fully, then switch the DNS. Never switch DNS at the same time as migrating.
- Most managed WooCommerce hosts offer free migration as part of signup. Ask before migrating manually.
- Stripe, PayPal, and WooPayments use webhooks that point to your domain. These need to be updated after migration or payment events stop processing.
- Your WooCommerce order emails may stop sending on the new host if you were using your old host’s built-in email. Configure an SMTP plugin before going live.
- Put your store in maintenance mode for 1-2 hours during the DNS changeover to prevent orders being placed on the wrong server.
- DNS changes take up to 48 hours to fully propagate. Keep your old hosting active for at least two weeks after the migration.
- If something goes wrong, you can point the DNS back to the old server within minutes.
Before You Start: Three Things to Confirm
Before you touch anything, confirm these three things.
Know why you are switching. The most common reasons are performance (your store is slow), support quality (your host is unresponsive), or cost.
Knowing the reason helps you choose the right new host and confirms the switch is worth the effort.
Know what you have. Log in to your WordPress admin and go to Plugins. Make a note of any plugins related to email sending (WP Mail SMTP, Postmark, SendGrid), payment processing (Stripe, PayPal, WooPayments), or site backup (UpdraftPlus, Jetpack).
These will all need attention during the migration.
Know your domain registrar. Your domain registrar is where you bought your domain name. Common registrars are GoDaddy, Namecheap, Google Domains, and Cloudflare. You will need to log in to your registrar to update your nameservers later.
Find those login credentials now, before you start.
Step 1: Choose Your New Host
Not all hosting is equally suited to WooCommerce. The right choice depends on your store’s size and budget.
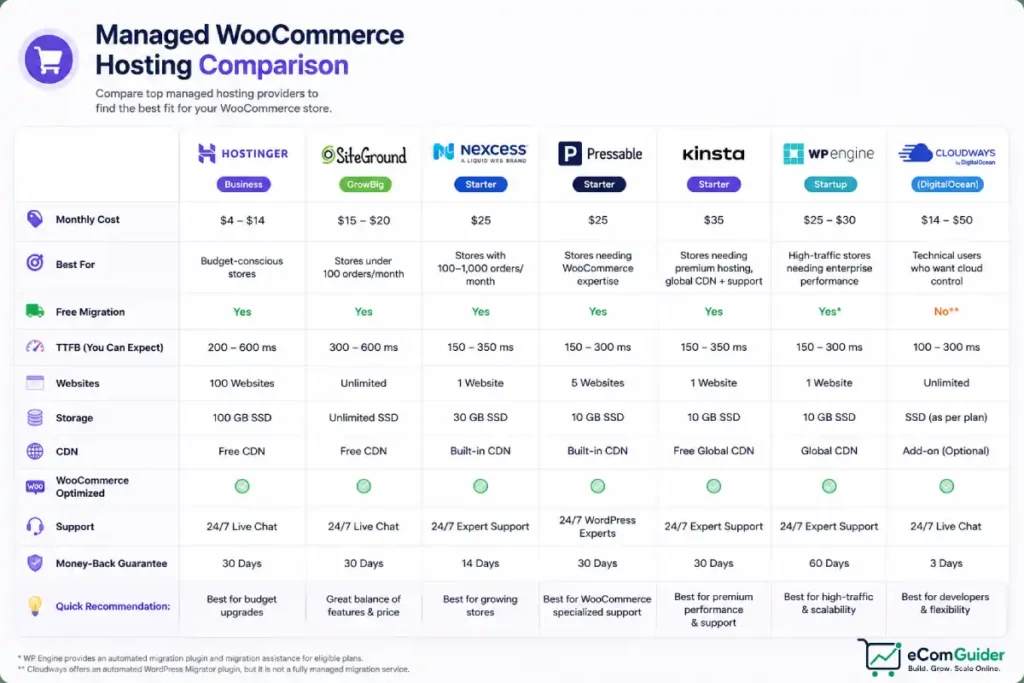
| Host | Monthly Cost | Best For | Free Migration? |
|---|---|---|---|
| Hostinger Business | $4–14 | Budget-conscious stores that want better performance | Yes |
| SiteGround GrowBig | $15–20 | Stores under 100 orders/month | Yes |
| Nexcess Starter | $25 | Stores with 100–1,000 orders/month | Yes |
| Pressable Starter | $25 | Stores needing WooCommerce expertise | Yes |
| Kinsta Starter | $35 | Stores needing premium managed hosting, global CDN, and expert support | Yes |
| WP Engine Startup | $25–30 | High-traffic stores that need enterprise-grade performance and scalability | Yes |
| Cloudways (DigitalOcean) | $14–50 | Technical users who want cloud control | No |
The most important question to ask any new host before signing up: Do you offer free site migration?
Nearly every managed WordPress and managed WooCommerce host offers free migration as part of signup. SiteGround, Nexcess, Pressable, and Kinsta all do.
This means a member of their team migrates your site for you at no extra cost. If you can get free migration, take it. It saves time, reduces risk, and their team will know their own platform better than you do.
When signing up, tell them you have a WooCommerce store and ask whether they have WooCommerce-specific migration experience. Good hosts will know what to check.
Step 2: Set Up Your New Hosting Account
After signing up, set up the basics on the new host before migrating anything.
- Log in to your new hosting account
- Create a hosting environment for your domain name. Most hosts call this Add Site or Create Site.
- Do not install WordPress yet if your host is going to migrate your site for you. Skip to Step 3.
- If you are migrating yourself, install a fresh WordPress through your hosting dashboard. Your host will have a one-click WordPress install option.
- Do not install WooCommerce or configure anything in WordPress yet. You will be replacing this fresh install with your actual site in the next steps.
- Locate your new hosting’s name servers. These are two addresses that look like ns1.siteground.net or erin.ns.cloudflare.com. Write them down. You will need them in Step 9.
Step 3: Back Up Your Current Site Completely
Before migrating, create a full backup. This is your safety net.
The backup must include two things: all your site files and your database. Missing either one means the backup is incomplete.
Method 1: UpdraftPlus (Recommended)
If you already have UpdraftPlus installed:
- Go to Settings, then UpdraftPlus in your WordPress admin
- Click Backup Now
- Make sure both Include your database in the backup and Include your files in the backup are ticked
- Wait for the backup to complete
- Download the backup files to your computer. Click the backup in the UpdraftPlus list, then click the database and files buttons to download each component.
Keep these files somewhere safe. You will not need them unless something goes wrong, but you want them available.
Method 2: cPanel Backup (If Your Host Provides cPanel)
Most shared hosting accounts include cPanel:
- Log in to cPanel through your hosting account
- Find the Backup or Backup Wizard option
- Download a Full Account Backup
- Save the file to your computer
This creates a complete backup of everything in your hosting account.
Check Your Backup Size
Note how large your backup is. If your site is under 512MB, all standard migration plugins handle it easily. If your site is over 512MB (common for stores with many product images), some migration plugins have file size limits you will need to work around. We cover this in Step 4.
Step 4: Migrate Your Site to the New Host
You have three options for migration. Option A is the easiest if your host offers it.
Option A: Let Your New Host Migrate For You (Easiest)
If your new host offers free migration, contact their support team and provide:
- Your current hosting login details
- Your current WordPress admin login details
- Your domain name
- A note that you have a WooCommerce store with active orders
They will handle the file and database transfer. Confirm with them that they have migrated the WordPress database, all WordPress files, and any uploaded content in the wp-content/uploads folder.
After they confirm the migration is complete, move to Step 5 and test before doing anything else.
Option B: All-in-One WP Migration Plugin
This plugin is the most beginner-friendly option for self-managed migration. It handles files and database in one package.
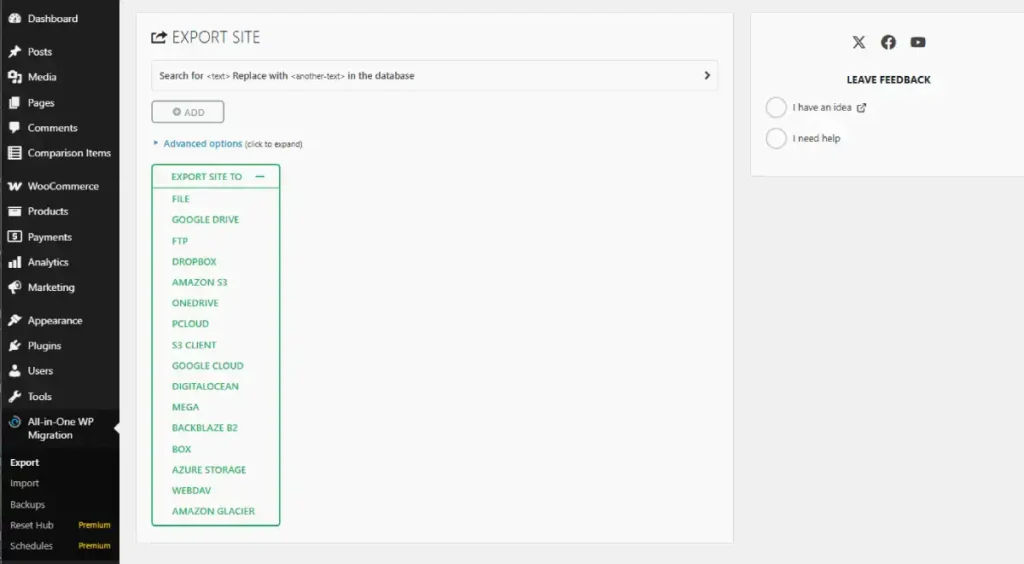
On your current site (the one you are moving FROM):
- Install and activate All-in-One WP Migration from the WordPress plugin directory
- Go to All-in-One WP Migration, then Export
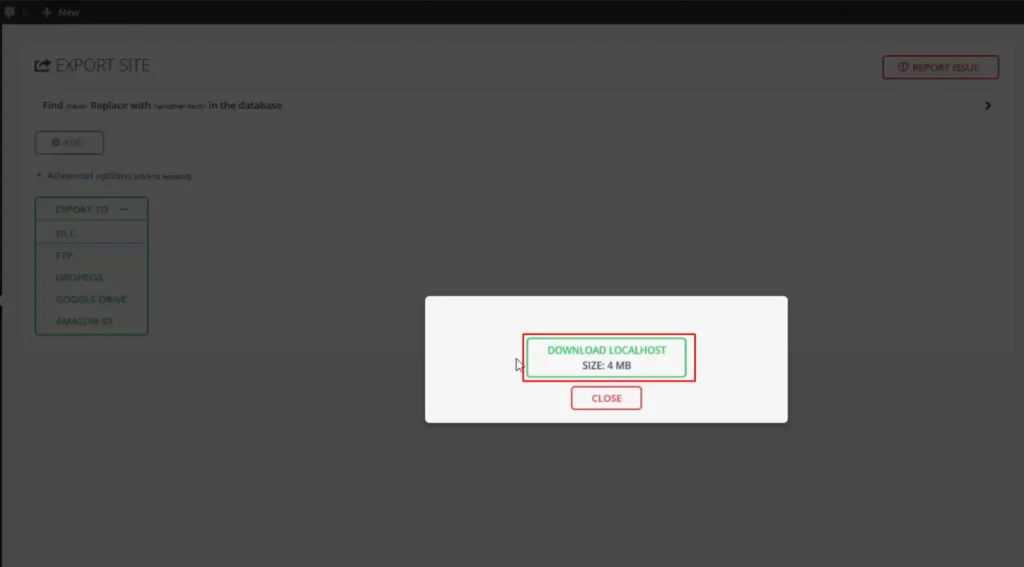
- Click Export to, then File
- Wait for the export to complete. This may take several minutes for larger stores.
- Download the .wpress file to your computer
File size limit: The free version of All-in-One WP Migration allows importing files up to 512MB. If your export file is larger, you need either the paid version ($69 one-time) or a different method.
On your new site (the one you are moving TO):
- Install and activate All-in-One WP Migration on the fresh WordPress install
- Go to All-in-One WP Migration, then Import
- Drag and drop your .wpress file or click to browse and select it
- Wait for the import to complete. For large stores this can take 10-20 minutes.
- When complete, you will be asked to log in again. Use your original site’s WordPress login credentials, not the new host’s.
After importing, go to Settings, then Permalinks, and click Save Changes without changing anything. This refreshes your permalink structure on the new host.
Option C: Duplicator Plugin
Duplicator is an alternative for stores that need more control over the migration. It is slightly more technical but handles larger sites more reliably.
On your current site:
- Install and activate Duplicator from the WordPress plugin directory
- Go to Duplicator, then Packages
- Click Create New
- Follow the steps and click Build when ready
- Download both files Duplicator generates: the archive (.zip) file and the installer (.php) file
On your new host:
- In your hosting file manager or via FTP, upload both Duplicator files to the root folder of your new site (usually public_html or www)
- Open a browser and go to yournewsite.com/installer.php
- Follow the installation wizard
- Duplicator will ask for your new database credentials. Create a new empty database in your new hosting control panel first and enter those details.
- Complete the wizard and log in to WordPress with your original credentials
Step 5: Test Your Site on the New Host (Before Touching DNS)
This step is critical and most guides rush past it. You need to fully test your WooCommerce store on the new host before anyone else can see it there.
The problem is that your domain still points to your old host. So how do you see the new host?
How to Preview Your New Site Without Changing DNS
Method 1: Hosts file edit
You can temporarily tell your computer to look at the new host when it visits your domain, without changing the DNS for everyone else.
On a Mac or Linux computer:
- Open Terminal
- Type:
sudo nano /etc/hosts - Enter your password
- At the bottom of the file, add a new line:
[new host IP address] yourdomain.com www.yourdomain.com - Replace [new host IP address] with the IP address your new host gave you
- Save with Ctrl+O, then Exit with Ctrl+X
- Now when you visit yourdomain.com in your browser, you see the new host
On Windows:
- Open Notepad as administrator (right-click Notepad, Run as administrator)
- Open the file C:\Windows\System32\drivers\etc\hosts
- Add the same line as above at the bottom
- Save the file
Remove this hosts file entry after you finish testing. While it is in place, you will not be able to see your old site from your computer.
Method 2: Temporary URL from your host
Many hosts provide a temporary URL to access your site before DNS is pointed. Ask your new host if they offer this. It looks like yourdomain.hostingname.com or an IP address.
The WooCommerce Test Checklist
Work through every item on this list on the new host before going live. Do not skip any of these.
Site basics:
- Homepage loads correctly
- Product pages display correctly with images
- Category pages work
- Search returns results
- Padlock (SSL/HTTPS) appears in the browser address bar on all pages
WooCommerce store:
- Add a product to the cart
- Update the cart quantity
- Remove a product from the cart
- Proceed to checkout
- Coupon codes apply correctly (test one if you have them)
- Shipping rates calculate correctly for at least two different destinations
- Tax calculations are correct
Payment processing (this is the most important test):
- Place a complete test order using your payment gateway’s test mode
- Confirm the order appears in WooCommerce admin under Orders
- Confirm an order confirmation email was received in your inbox
- Confirm the admin order notification email was received
- If you have subscriptions, place a test subscription order
After the test order:
- Process a refund on the test order and confirm it processes correctly
- Mark the test order as completed
Admin functions:
- Log in to the WordPress admin without errors
- Open the WooCommerce Orders list. Does it load quickly?
- Open a product to edit it. Does it save correctly?
If any item on this checklist fails, resolve it before going live. Do not proceed to DNS change until every item passes.
Step 6: Fix Payment Gateway Webhooks
This is the most commonly missed step in WooCommerce migrations. If you skip it, your payment gateway will stop sending payment events to your store after migration.
What a Webhook Is and Why It Matters
When someone pays for an order on your store, Stripe (or PayPal) processes the payment. Stripe then sends a notification back to your store to confirm the payment succeeded. This notification is called a webhook.
Your payment gateway has your domain name saved as the address to send these notifications. During a migration, the domain initially still points to the old server.
When you switch DNS, Stripe now sends those notifications to the new server. But Stripe may still have the old server’s specific URL saved in some cases.
Webhooks are used for: confirming payments, processing subscription renewals, handling refund confirmations, and updating order statuses automatically.
If they stop working, orders may appear as pending forever, subscriptions may fail to renew, and refunds may not register in your store.
Updating Stripe Webhooks
- Log in to your Stripe Dashboard at dashboard.stripe.com
- In the left menu, click Developers, then Webhooks
- Look at the webhook endpoint listed. It should say yourdomain.com/wc-api/WC_Stripe or similar.
- Your domain name is the same, so the webhook URL itself does not change. What matters is that Stripe can reach your new server once DNS is pointed.
- After you switch DNS (Step 9), come back here and check the webhook delivery log. Any webhook event that shows Failed needs to be resent by clicking Send again.
If you use Stripe’s Automatic Stripe migration, their hosted webhooks system, the URL remains the same and no action is needed.
Updating PayPal
- Log in to your PayPal business account
- Go to Account Settings, then Notifications, then Instant payment notifications
- Confirm the notification URL matches your current domain
- No change is needed if your domain name stays the same
WooPayments
WooPayments handles webhooks automatically. No manual configuration is needed after migration. After switching DNS, log in to WooCommerce admin, go to WooCommerce, then Payments, then WooPayments.
If any errors appear, disconnect and reconnect the WooPayments account.
Step 7: Check Your Email Configuration
This is the second most commonly missed step. WooCommerce sends order confirmation emails, admin notifications, shipping updates, and other transactional emails. If these stop working after migration, your customers receive nothing and you receive no order notifications.
Why Email Breaks During Migration
Many stores rely on their hosting’s built-in email sending (known as PHP mail). This is the default configuration in WordPress. When you move to a new host, the email sending behavior changes. Many managed hosts restrict or disable PHP mail entirely to prevent spam.
The result is that all WooCommerce emails silently fail after migration.
The Fix: Use an SMTP Plugin
An SMTP plugin sends your store’s emails through a dedicated email service rather than your hosting. This is more reliable than PHP mail on any host.
If you do not already have one, install WP Mail SMTP (free version) before you go live on the new host.
WP Mail SMTP supports several email services:
| Email Service | Free Tier | Best For |
|---|---|---|
| Gmail (via Google Workspace) | Yes, with Google account | Stores sending under 500 emails/day |
| Brevo (formerly Sendinblue) | 300 emails/day | Stores sending moderate volume |
| Mailgun | 100 emails/day free | Stores needing reliable deliverability |
| SendGrid | 100 emails/day free | Stores needing reliability and reporting |
After installing WP Mail SMTP:
- Go to WP Mail SMTP in your WordPress admin
- Follow the setup wizard
- Connect to your chosen email service
- Click Send Test Email and confirm the test arrives in your inbox
- Do this before going live
Step 8: Put Your Store in Maintenance Mode
When you change your DNS settings, there is a period of 24 to 48 hours where different visitors around the world see different servers. Some see the old host. Some see the new host.
If someone places an order while on the old server during this transition window, that order never appears on the new server.
It is effectively lost from your new setup. You can retrieve it from the old server, but this requires manual work and creates confusion.
The solution is to put your store in maintenance mode during the DNS changeover.
What Maintenance Mode Does
Maintenance mode shows visitors a temporary page saying your store is undergoing maintenance.
They cannot place orders. This looks professional, and the typical changeover window is short enough (1-3 hours maximum if done correctly) that the impact on sales is minimal.
How to Enable Maintenance Mode
Install WP Maintenance Mode (free).
- Go to Settings, then WP Maintenance Mode in your WordPress admin
- Change the Status to Activated
- Customize the message if you want. Something like: We are updating our store. We will be back within a few hours.
- Make sure the Bypass for logged-in users option is on, so you can still access the admin
- Click Save Settings
Enable this on your current site (old host) immediately before you update the DNS.
Step 9: Switch the DNS
DNS (Domain Name System) is the system that tells visitors’ browsers which server to look at when they visit your domain. Changing the DNS is how you redirect traffic from your old host to your new host.
Understanding Name Servers
When you switch hosting, you typically update your name servers. Name servers are two addresses that your domain registrar uses to decide where to send visitors.
Your old host’s name servers might look like: ns1.oldhost.com and ns2.oldhost.com
Your new host’s name servers will look like: ns1.newhost.com and ns2.newhost.com
You change these in your domain registrar account, not in either hosting account.
How to Update Your Name Servers
- Log in to your domain registrar (GoDaddy, Namecheap, Cloudflare, or wherever you bought your domain)
- Find your domain and look for DNS Settings, Name Servers, or Manage DNS
- Look for the option to use Custom Name Servers or Change Name Servers
- Replace the existing name server addresses with the ones your new host provided
- Save the changes
Changes take between a few minutes and 48 hours to fully take effect worldwide. Most updates complete within 2-4 hours.
During the DNS Propagation Window
While DNS is propagating:
- Your store is in maintenance mode, so no new orders are being placed
- Some visitors see the old server, some see the new server
- This is normal and not a problem because maintenance mode prevents orders on either server
After 1-2 hours, visit your domain on a device that has not visited your store recently (a mobile device on cellular data works well for this). If you see the new host’s version of your site, DNS has likely propagated.
Once you can confirm your domain is pointing to the new server:
- Go to the old host and turn off maintenance mode there
- Go to the new host and turn off maintenance mode there
- Run a complete test order on your live domain to confirm everything works
Step 10: Verify After Go-Live
Your store is now live on the new host. These are the checks to run in the first 24 hours.
Immediate Checks (Within 1 Hour of Go-Live)
- Visit your store from a browser you have not used before. Confirm it loads on the new server.
- Place a live test order with a real payment. Process a refund immediately after.
- Confirm order confirmation email arrived
- Confirm admin notification email arrived
- Check WooCommerce admin. Confirm the test order appears.
- Check your Stripe or PayPal dashboard. Confirm the test payment and refund show there.
Checks Within 24 Hours
- Check your Stripe webhook log (Developers, Webhooks in Stripe dashboard). Confirm no failed events.
- If you have subscriptions, check that any renewals due in the next few days are processed correctly.
- Check your Google Search Console (if set up) for any crawl errors.
- Run your store through Google PageSpeed Insights and confirm performance has improved.
When to Cancel Your Old Hosting
Do not cancel your old hosting immediately. Keep it active for at least two to four weeks.
If a problem appears in the days after migration that you cannot fix, you can point your DNS back to the old server within minutes and continue operating normally while you resolve the issue. If you have already cancelled the old hosting, this option is gone.
After two to four weeks with no problems, you can safely cancel your old hosting account. Before cancelling, download a final backup from the old host just in case you ever need to reference old data.
Step 11: Clean Up
After confirming everything is working:
- Remove All-in-One WP Migration or Duplicator from your new site. Migration plugins are not needed in day-to-day operation and add unnecessary overhead.
- Remove the installer.php file if you used Duplicator. This file is a security risk if left in place.
- Remove WP Maintenance Mode if you no longer need it, or keep it for future use.
- Run a speed test on your new host to confirm performance has improved. Compare against your original baseline numbers.
What If Something Goes Wrong
Migrations sometimes produce unexpected problems. Here is how to handle the most common ones.
Problem: White screen or error after migration
This usually means a PHP error or a plugin conflict on the new host.
Fix:
- Turn on WordPress debug mode by adding this to your wp-config.php file:
define( 'WP_DEBUG', true );define( 'WP_DEBUG_LOG', true ); - Visit the broken page and then check the debug.log file in your wp-content folder
- The error message will tell you which plugin or file is causing the problem
- Contact your new host’s support with the error message. Managed hosts can usually diagnose this quickly.
Problem: WooCommerce emails not sending
This means the email configuration from the old host did not transfer. Install WP Mail SMTP as described in Step 7 and configure it with a dedicated email service.
Test with WP Mail SMTP’s built-in test email function. Do not skip this test.
Problem: Orders placed after migration do not show up
This happens when DNS propagated for some visitors but not others, and orders were placed on the old server during that window.
Fix:
- Log in to your old hosting’s WordPress admin
- Go to WooCommerce, then Orders
- Note any orders that appeared after the migration that are not on the new server
- Re-create these orders manually on the new server, or contact the customers directly to process their orders
This is why maintenance mode during the changeover window is important. If you used maintenance mode, this scenario should not occur.
Problem: Payment gateway shows errors
Usually this means the webhook configuration is not reaching your new server, or a payment gateway plugin needs its API keys re-entered on the new host.
Fix:
- Go to WooCommerce, then Settings, then Payments
- Click on your payment gateway (Stripe, PayPal, etc.)
- Check that the API keys are entered. In some cases, migration plugins do not transfer these for security reasons.
- Re-enter your API keys from your payment gateway dashboard
- Click Test Connection if the option appears
- Place a test order in test mode to confirm
How to Roll Back If Needed
If something is critically wrong and you cannot fix it quickly:
- Go to your domain registrar
- Change your name servers back to your old host’s name servers
- Within a few hours, traffic will return to your old server
- Your old site is still intact (as long as you have not cancelled that hosting)
- Now you have time to diagnose the problem without affecting your live store
This is the main reason to keep your old hosting active for several weeks.
WooCommerce Hosting Migration: Summary
| Step | What You Do | Why It Matters |
|---|---|---|
| 1 | Choose new host | Free migration saves you significant time and risk |
| 2 | Set up new hosting account | Creates the environment for your store to move into |
| 3 | Back up your current site | Your safety net if something goes wrong |
| 4 | Migrate site to new host | Copies all files and database to the new server |
| 5 | Test everything on new host | Catch problems before visitors see them |
| 6 | Update payment webhook settings | Prevents payment events from breaking after migration |
| 7 | Set up SMTP email | Prevents order emails from silently failing |
| 8 | Enable maintenance mode | Prevents orders being placed on the wrong server during DNS changeover |
| 9 | Switch DNS | Redirects all traffic to the new host |
| 10 | Verify after go-live | Confirms everything works under real conditions |
| 11 | Clean up | Removes migration tools and confirms performance improvement |
The full process takes most store owners 2-4 hours of active work, plus 24-48 hours of waiting for DNS propagation. Plan to do this on a low-traffic day such as a Tuesday or Wednesday morning.
WooCommerce runs significantly better on managed WooCommerce hosting than on shared hosting.
The performance improvement you see after migration is usually immediate and measurable.
Your hosting costs go up, but the conversion rate improvement from faster pages typically more than covers the difference for stores doing meaningful volume.
If after completing this migration you find WooCommerce’s ongoing maintenance burden outweighs its benefits for your store, Shopify handles hosting, updates, and infrastructure without any of this work.
The trade-off is a monthly subscription and less flexibility. Worth evaluating if this migration process felt like more than you want to manage regularly.
FAQ’s
How long does it take to switch WooCommerce hosting?
2-4 hours of active work, plus 24-48 hours waiting for DNS to propagate. Most managed hosts offer free migration that cuts the active work to under an hour. Keep the migration and DNS switch on separate days.
Can I switch WooCommerce hosting without any downtime?
Near zero is achievable. Migrate fully and test on the new host first, then enable maintenance mode for 1-2 hours while DNS propagates. Most visitors see a brief maintenance page at most.
Do I need a developer to migrate WooCommerce?
No, for most stores. Get a developer if you have active subscriptions, custom code, a site over 1GB, or integrations that must not break during migration.
What happens to orders during a WooCommerce migration?
Orders placed before you start the migration are copied with your database. Orders placed during the DNS propagation window are the risk. Enabling maintenance mode during the changeover prevents customers from placing orders during this window, which eliminates the risk.
Does switching hosting affect my Google rankings?
No, if done correctly. Your URLs and content stay the same. A 1-2 hour maintenance window has no meaningful impact. Extended downtime of several hours can affect rankings, so keep the changeover as short as possible.
How do I know when DNS has propagated?
Visit your domain on a mobile phone using cellular data, not WiFi. If it shows the new host’s version, DNS has propagated for that network. Check whatsmydns.net for a global view.
What if my WooCommerce site is too large to migrate with a free plugin?
The free All-in-One WP Migration plugin limits imports to 512MB. Options above that size: use your new host’s free migration service, buy the paid plugin ($69), or use Duplicator, which handles larger sites without a file size cap.
Should I keep my old hosting after migrating?
Yes, for at least two to four weeks. If something breaks, you can point DNS back to the old server in minutes. Cancel only after two to four weeks of no problems on the new host.
That is the complete process. Work through each step in order, test thoroughly before switching DNS, and keep your old hosting active for a few weeks as a fallback. The improvement in WooCommerce performance after moving to proper managed hosting is one of the most impactful changes a growing store can make.