
Setting up WooCommerce takes two to three hours if you follow the steps in the right order. The biggest mistakes happen when people skip steps or configure settings in the wrong sequence.
This WooCommerce setup guide covers every single step, from picking a host to adding your first product and testing checkout, so you can launch a working store without going back and fixing things later.
WooCommerce powers over 36% of all ecommerce websites globally, more than any other platform. The plugin itself is free. What you pay for is hosting, a domain, and any extensions you add on top.
Before you start, you need three things: a domain name, a hosting account, and 2 to 3 hours of uninterrupted time.
✓ Pros
- ✓ Open-source and free to use
- ✓ Highly customizable with thousands of plugins and themes
- ✓ Seamless integration with WordPress
- ✓ Extensive payment and shipping options
- ✓ Strong community support and frequent updates
✗ Cons
- ✗ Requires self-managed hosting and security
- ✗ Plugin conflicts can break functionality
- ✗ No central customer support team
- ✗ Steeper learning curve for non-technical users
- ✗ Hidden costs (hosting, premium extensions)
- ✗ Maintenance updates are your responsibility
Woocommerce Setup Guide Step 1: Choose Your Hosting
WooCommerce runs on WordPress, which runs on a web hosting server. The quality of your hosting determines your store’s speed, security, and uptime. Cheap shared hosting works for small stores with low traffic. As your store grows, slow hosting directly costs you sales.
Minimum requirements for WooCommerce in 2026:
- PHP 8.1 or higher (8.2 recommended)
- MySQL 5.7 or MariaDB 10.4 or higher
- HTTPS/SSL certificate
- At least 512MB of PHP memory limit (1GB recommended)
Hosting types and what they cost:
| Type | Monthly cost | Good for |
|---|---|---|
| Shared hosting | $3 to $10 | New stores, under 100 orders/month |
| Managed WordPress hosting | $25 to $80 | Growing stores, better performance |
| VPS hosting | $20 to $80 | More control, good for technical users |
| Dedicated server | $100+ | High-traffic stores |
For most new stores, managed WordPress hosting from providers like SiteGround, Cloudways, or Kinsta is the practical choice. These hosts optimise their servers specifically for WordPress and WooCommerce, include automatic backups, and handle software updates.
When you sign up for hosting, you either register a new domain or connect an existing one. A domain costs $10 to $20 per year through most registrars. Most hosts offer a free domain for the first year with a hosting plan.
For a comparison of platforms and their hosting costs, see the Shopify vs WooCommerce breakdown, which covers WooCommerce hosting costs at different revenue levels.
Woocommerce Setup Guide Step 2: Install WordPress
WooCommerce is a plugin for WordPress. You need WordPress running before you can install WooCommerce.
Most hosting providers offer a one-click WordPress installation from their dashboard. Look for a button labelled “Install WordPress” or “Create Website” in your hosting control panel. Click it, enter your site name and admin email, create a password, and WordPress installs automatically. This takes under two minutes.
Once installed, your WordPress dashboard is at yourdomain.com/wp-admin. Bookmark this URL. Log in with the username and password you created during installation.
If your host does not offer one-click installation, you can install WordPress manually by downloading the package from WordPress.org, uploading the files to your server via FTP, creating a database in your hosting control panel, and running the setup script.
Most hosts support one-click installation, so manual installation is rarely necessary.
Woocommerce Setup Guide Step 3: Install the WooCommerce Plugin
From your WordPress dashboard:
- Go to Plugins in the left menu, then click Add New Plugin
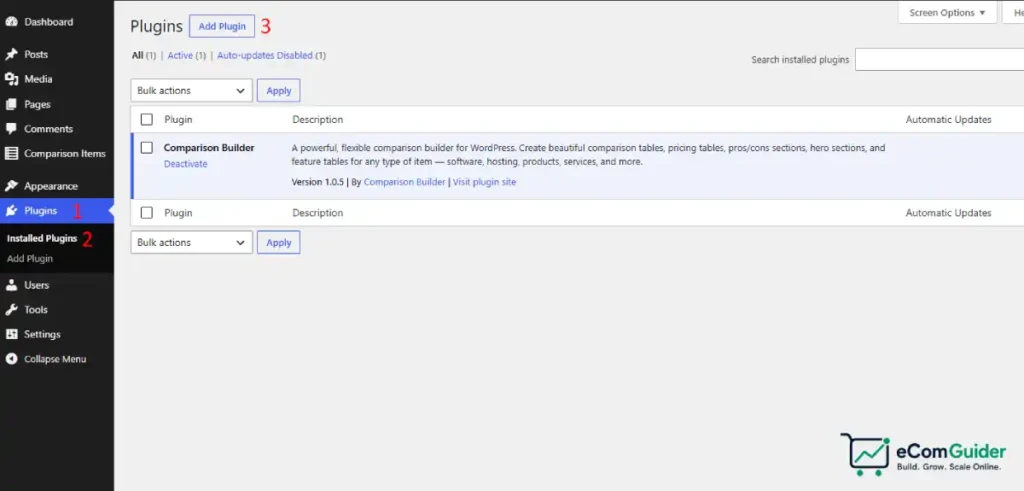
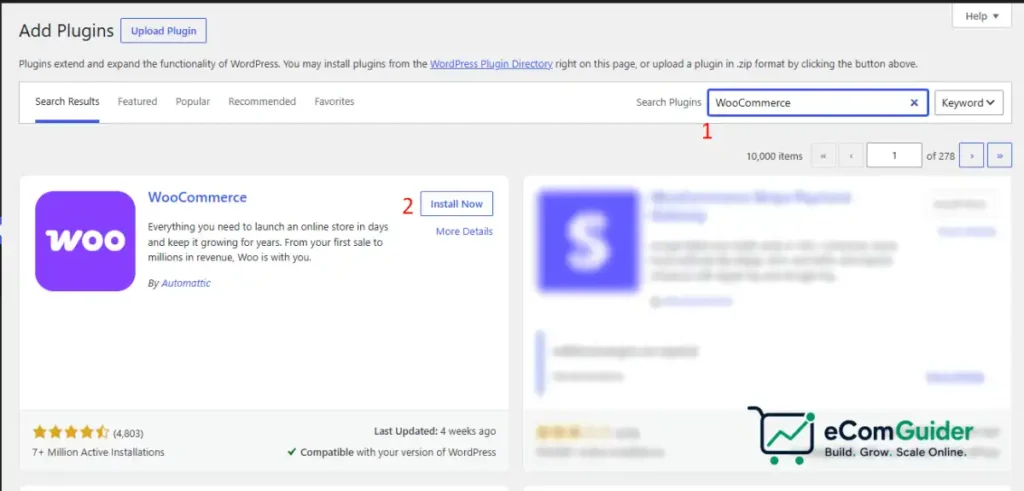
- In the search bar, type WooCommerce
- Click Install Now next to the WooCommerce plugin (by WooCommerce)
- After installation completes, click Activate
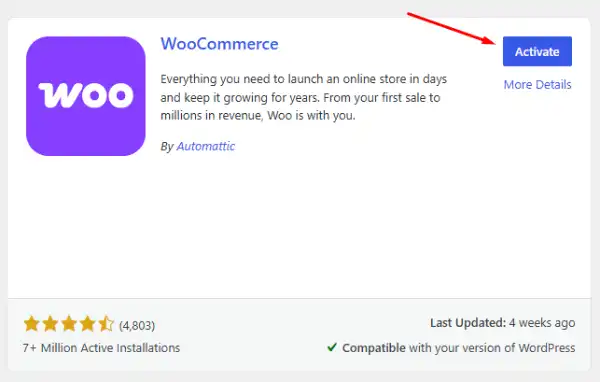
That is all that is required to install WooCommerce. After activation, the setup wizard launches automatically. You can either work through the wizard or close it and configure everything manually. The wizard is the faster path for most people.
Woocommerce Setup Guide Step 4: Complete the Setup Wizard
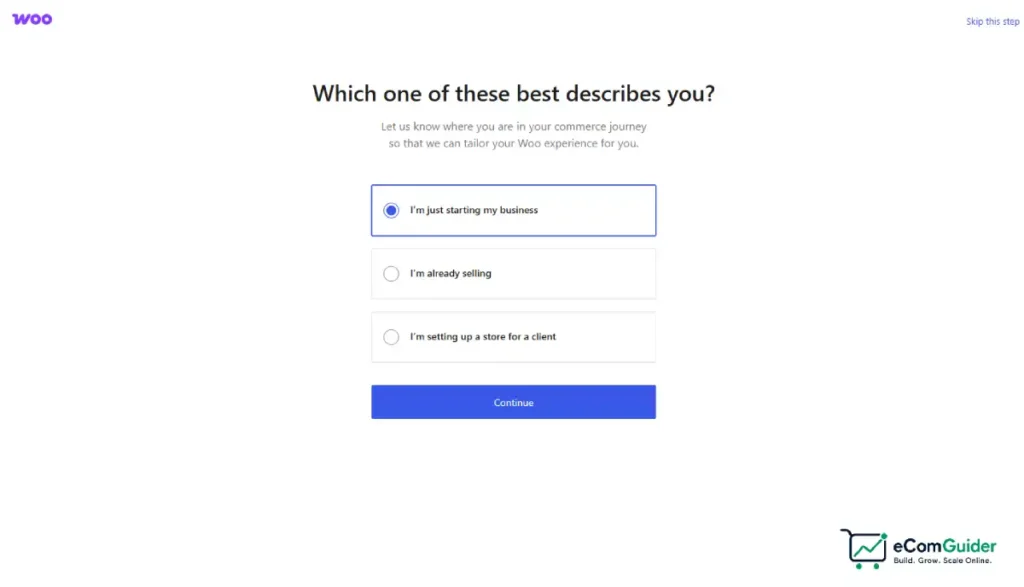
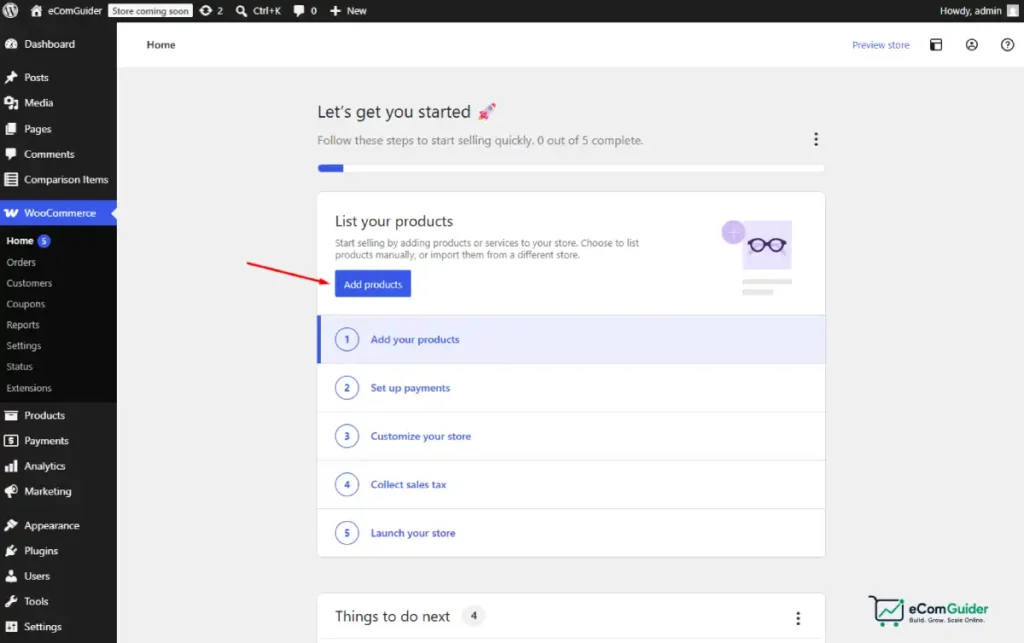
The WooCommerce setup wizard covers five steps. Work through each one rather than skipping ahead.
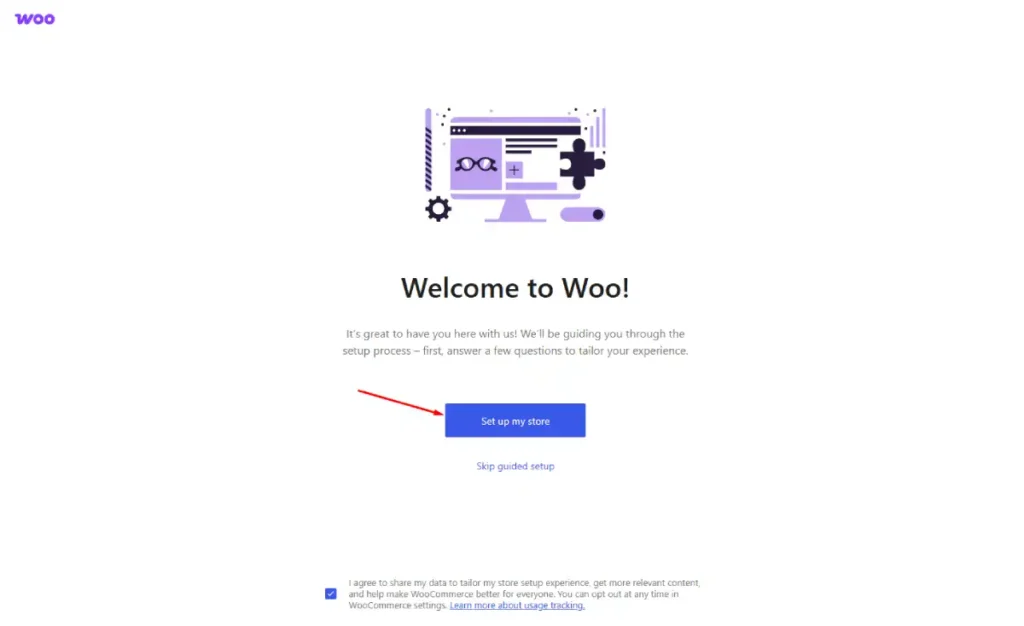
Step 4a: Store details
Enter your store’s physical address. WooCommerce uses this address for tax calculations and shipping rate defaults. If you sell internationally, accuracy matters here. Set your default currency and select your country and state.
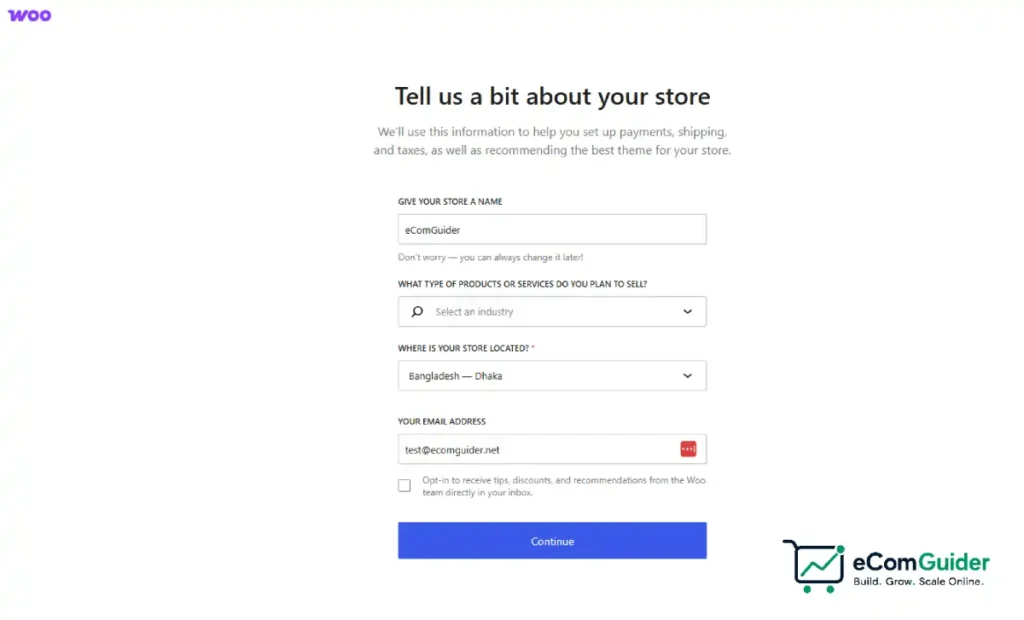
Step 4b: Industry
Select the type of products you sell. WooCommerce uses this to recommend relevant extensions. Do not overthink this. Pick the closest category and move on.
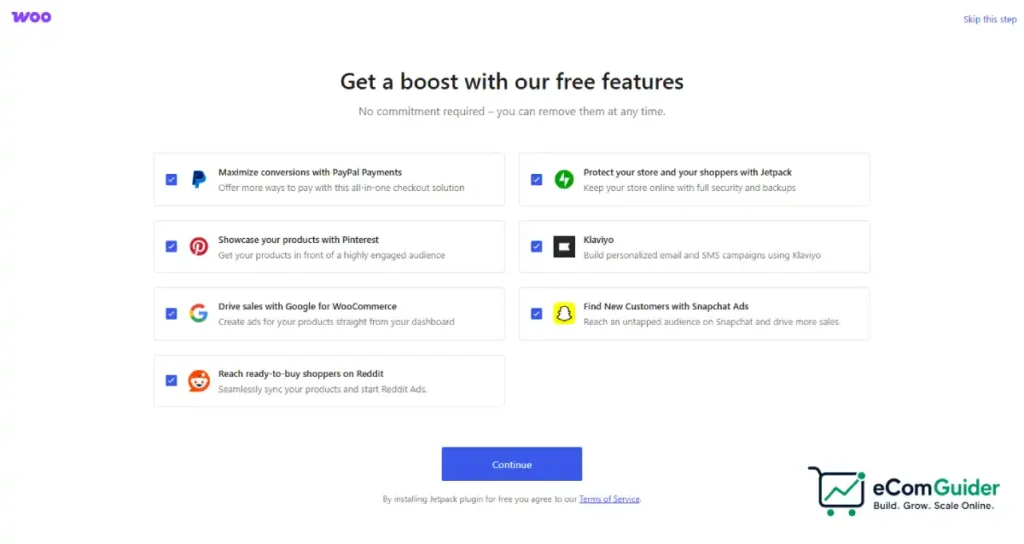
Step 4c: Product types
Select what you plan to sell:
- Physical products: items you ship to customers
- Downloads: digital files like ebooks, music, software
- Both: for stores selling a mix of physical and digital products
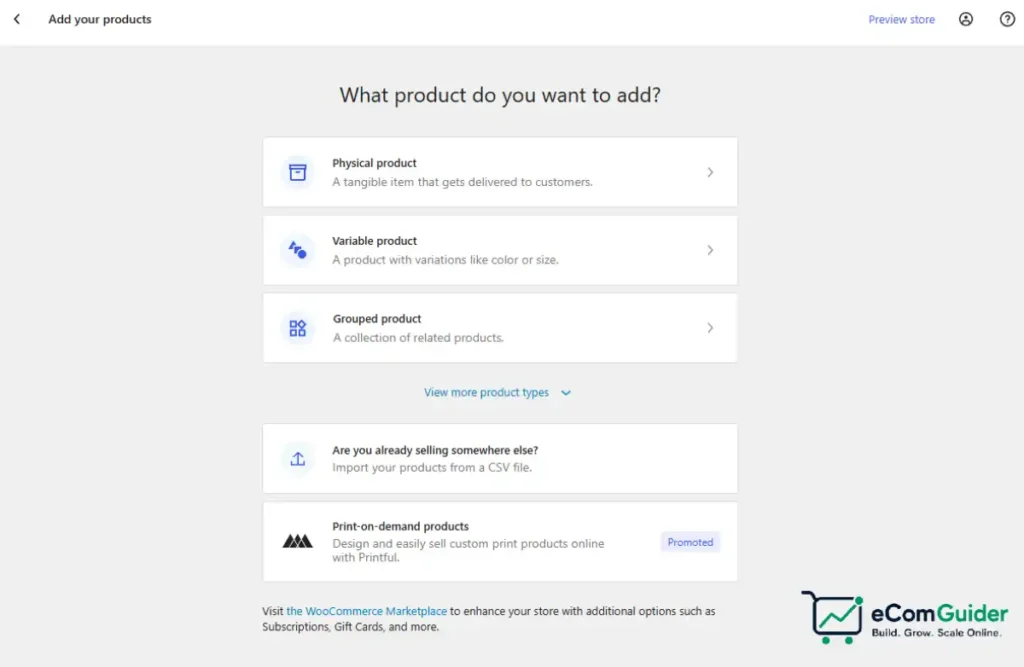
Step 4d: Business details
Enter how many products you plan to list and whether you sell on other platforms. WooCommerce may suggest paid extensions here. Skip them for now. You can add extensions later when you have a specific need.
Step 4e: Theme
WooCommerce suggests themes here. The free Storefront theme is a solid, WooCommerce-specific option to start with. You can change themes later. Click Continue with my active theme if you want to skip this step.
After completing the wizard, WooCommerce automatically creates four essential pages: Shop, Cart, Checkout, and My Account. These pages appear in your Pages list in WordPress.
Woocommerce Setup Guide Step 5: Configure General Settings
Go to WooCommerce > Settings > General in your WordPress dashboard. Review and complete every field on this page.
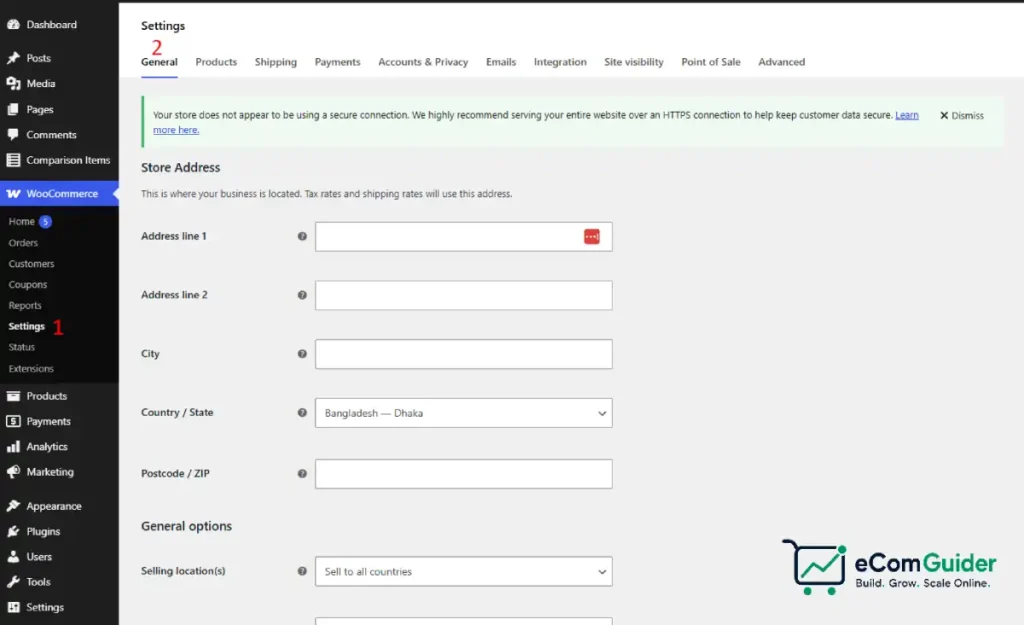
Store address: Confirm your full address including country, state, and postal code. This drives tax calculations.
Selling locations: Choose whether you sell to all countries, specific countries, or one country only. You can always expand this later.
Shipping locations: Similar to above. If you only ship domestically for now, set this to your home country.
Default customer location: Set this to Geolocate if you have an international customer base. For domestic-only stores, set it to your country.
Enable taxes: Check the box to enable tax rates and calculations. If you skip this, the Tax settings tab does not appear.
Enable coupons: Leave this on unless you have a specific reason to turn it off. Discount codes are a standard marketing tool.
Currency: Confirm this is set correctly. Currency cannot be changed easily after orders start coming in.
Click Save changes at the bottom of the page before moving to the next section.
Woocommerce Setup Guide Step 6: Configure Payment Gateways
Go to WooCommerce > Settings > Payments. This is where you enable and configure how customers pay.
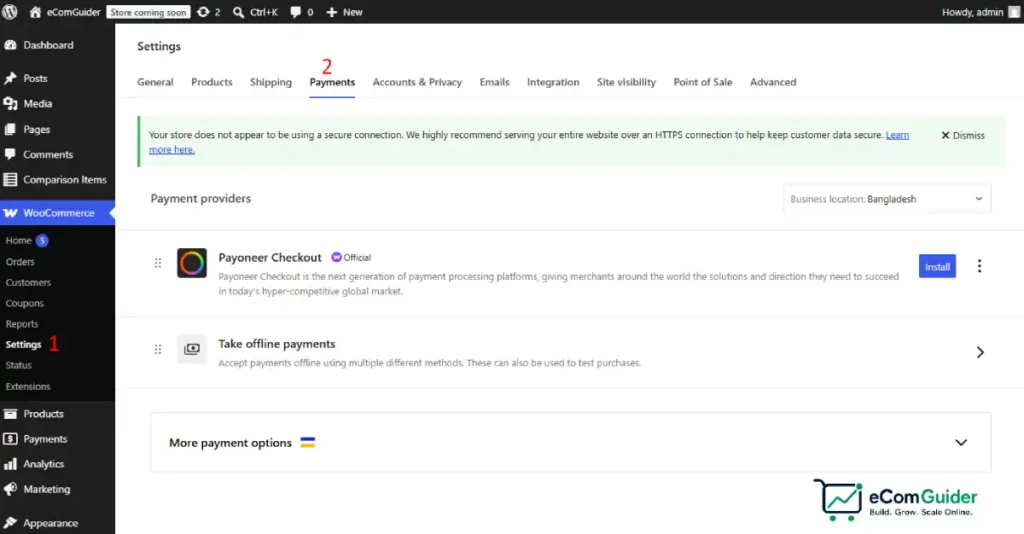
WooPayments (recommended)
WooPayments is WooCommerce’s built-in payment processor, powered by Stripe. It accepts credit cards, Apple Pay, Google Pay, and more. There are no monthly fees. You pay only the transaction fee: 2.9% + $0.30 for standard US cards.
To enable it: Click Set up next to WooPayments and follow the onboarding steps, which require a business email, a bank account for payouts, and identity verification.
Stripe (direct integration)
If you prefer to manage your Stripe account directly, search the WordPress plugin directory for the official Stripe plugin for WooCommerce and install it. Go to WooCommerce > Settings > Payments, enable Stripe, click Set up, and enter your Stripe API keys from your Stripe dashboard.
PayPal
WooCommerce includes a PayPal payment gateway by default. Go to WooCommerce > Settings > Payments, enable PayPal, and enter your PayPal email address. For more advanced PayPal features, install the official PayPal Payments plugin.
Bank transfer (BACS)
For stores that accept wire transfers or bank payments, enable Direct Bank Transfer in the Payments settings. Enter your bank name, account number, sort code, IBAN, and BIC in the configuration fields.
Cash on delivery
If you offer local delivery or pickup with cash payment, enable Cash on Delivery and configure the title and description that customers see at checkout.
Test your payment gateway before going live. Most gateways include a test mode. In Stripe and WooPayments, go to Settings, enable test mode, and place a test order using the test card number 4242 4242 4242 4242 with any future expiry date and any 3-digit CVV.
Woocommerce Setup Guide Step 7: Configure Shipping
Go to WooCommerce > Settings > Shipping. WooCommerce uses shipping zones to control which methods and rates apply to different geographic areas.
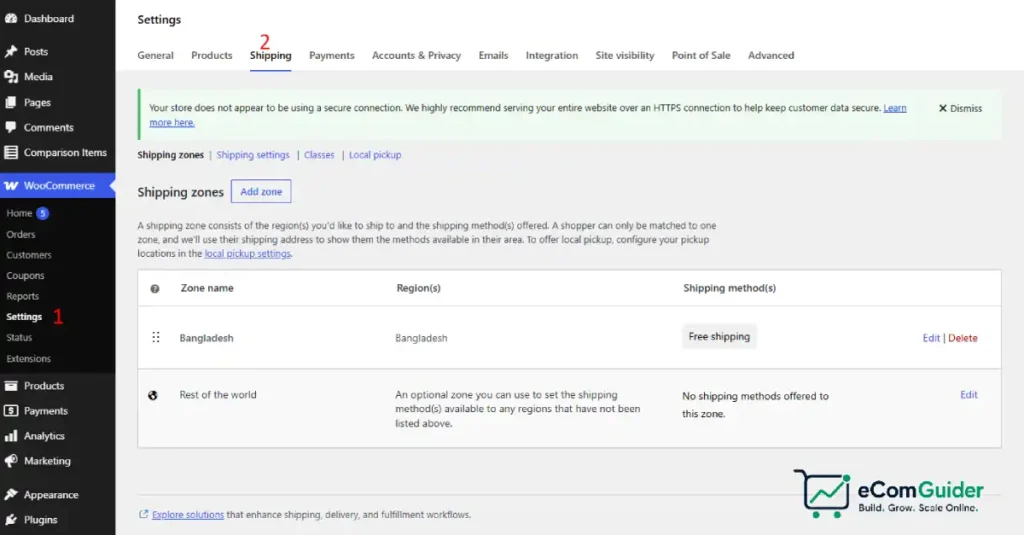
Step 7a: Create a shipping zone
Click Add shipping zone. Give it a name (for example, Domestic or United States). In the Zone regions field, add the countries, states, or postal codes this zone covers. Click Add shipping method to add one or more methods to this zone.
Shipping methods available by default:
- Flat rate: charges a fixed amount per order or per item. Click the method to configure the cost. You can use a formula like: 5.00 + (1.00 * [qty]) to charge $5 base plus $1 per item.
- Free shipping: offers free shipping when conditions are met (minimum order amount, coupon code, or always free). Configure the minimum order amount in the method settings.
- Local pickup: lets customers collect orders in person, no shipping required.
Step 7b: Add real-time carrier rates
For live carrier-calculated rates from USPS, UPS, FedEx, or DHL, you need either the Advanced plan on Shopify (built in) or a plugin on WooCommerce. The official WooCommerce Shipping plugin (free) supports USPS and DHL label printing with discounted rates in the US. Install it from Plugins > Add New, search WooCommerce Shipping, and follow the setup wizard.
Step 7c: Set up additional zones
Create a separate zone for international orders if you ship overseas. Add the countries you ship to and configure the methods and rates for those destinations.
Shipping classes
If you sell products with different shipping costs (heavy items, oversized products, fragile goods), use shipping classes to assign different rates to different product types. Go to WooCommerce > Settings > Shipping > Shipping classes, add your classes, then set rates for each class in the flat rate method settings.
Woocommerce Setup Guide Step 8: Configure Taxes
Go to WooCommerce > Settings > Tax. This tab only appears if you enabled taxes in Step 5.
Tax settings (Tax Options tab):
- Prices entered with tax: Select No for US-based stores (enter prices exclusive of tax). Select Yes if you are in the EU or other regions where prices are displayed tax-inclusive.
- Calculate tax based on: Customer shipping address is the default and correct setting for most stores.
- Shipping tax class: Leave as Based on cart items unless your jurisdiction requires a different rule.
- Display prices in the shop: Excluding tax for US stores. Including tax for EU stores.
Adding tax rates manually:
Click the Standard rates tab. Click Insert row. Enter the country code (US), state code (CA for California, for example), the rate percentage (10.25%), and check the Shipping box if shipping is taxable in that state. Repeat for each jurisdiction where you have tax obligations.
Automated taxes:
For US stores, WooCommerce Tax (free, powered by Jetpack) automates rate calculations across all US states. Install it from the WooCommerce Marketplace or by searching for WooCommerce Tax in Plugins. Once active, it handles rate lookups automatically. You still need to file and remit taxes separately; the plugin only calculates them at checkout.
European stores should configure VAT rates for each member state, or use a VAT automation service to handle EU OSS compliance.
Woocommerce Setup Guide Step 9: Configure Email Notifications
Go to WooCommerce > Settings > Emails. WooCommerce sends transactional emails for new orders, order status changes, and customer account actions. These are functional and go out by default once you configure the sender details.
Important settings:
- From name: Enter your store’s name. This is the sender name customers see in their inbox.
- From address: Enter the email address emails are sent from. Use a domain-based address (you@yourstore.com), not a Gmail or Hotmail address.
Click each email type to customise the subject line and body content if needed. The defaults are functional but generic.
SMTP configuration:
The default WordPress email function (wp_mail) is unreliable and often lands in spam. Install a free SMTP plugin like WP Mail SMTP, go to its settings, and connect it to a transactional email service like Gmail SMTP (free, up to 500/day), SendGrid (free up to 100/day), or Postmark (paid but reliable). This ensures order confirmations actually reach your customers.
Woocommerce Setup Guide Step 10: Choose and Configure Your Theme
Your theme controls how your store looks. WooCommerce works with thousands of themes but performs best with themes built specifically for it.
Free options:
- Storefront (by WooCommerce): clean, fast, and fully compatible. Good starting point.
- Astra (free version): lightweight and easy to customise, with a WooCommerce-ready starter template.
- GeneratePress (free version): minimal and very fast. Good for performance-focused stores.
Premium options:
Premium themes from the WooCommerce Marketplace cost $150 to $400 as a one-time purchase. They typically include more layout options, built-in mega menus, and advanced product filtering.
To install a free theme: Go to Appearance > Themes > Add New, search for the theme name, click Install, then Activate.
After activating a theme, go to Appearance > Customize to set your logo, colours, typography, and header/footer layout.
|
Free
|
Extensions & Hosting
|
|---|---|
|
free
|
Custom
|
|
|
Woocommerce Setup Guide Step 11: Add Your First Product
Go to Products > Add New. This is where you create your product listings.
Product name: Enter a clear, descriptive name at the top. Include what the product is and any key attribute (size, material, colour).
Product description (long): The large text area on the right. Use this for full product details, specifications, use cases, and any information a customer needs to make a buying decision.
Product short description: The smaller text area below the product data panel. This appears directly under the product name on the product page. Keep it to two or three sentences.
Product data panel: This is the main settings area below the description. Set the product type:
- Simple product: one item, one price. The default.
- Variable product: multiple variants like sizes or colours. You add attributes and then generate variations.
- Grouped product: a collection of related simple products displayed together.
- External/Affiliate product: links to a product on another site.
For a simple product, set the regular price in the General tab. You can also set a sale price with optional start and end dates.
Inventory tab: Enter an SKU if you use one. Enable Manage stock and enter the quantity if you want automatic stock tracking. Set Allow backorders to your preference.
Shipping tab: Enter the product’s weight and dimensions. WooCommerce uses these for carrier-calculated shipping rates. If you created shipping classes in Step 7, assign the correct class here.
Product category: In the right sidebar, assign the product to a category. Create categories that reflect how your customers browse (by product type, use case, or audience).
Product image: Upload the main product image in the Product image box in the right sidebar. Add additional angles or detail shots in the Product gallery box below it.
Click Publish to make the product live. Check it on your site’s front end to confirm it displays correctly.
Woocommerce Setup Guide Step 12: Install Essential Plugins
WooCommerce handles the core commerce functionality. These additional plugins cover the remaining essentials.
SEO: Install Rank Math or Yoast SEO (both free). Go through the setup wizard to configure your site title, meta description format, and sitemap. This ensures your product pages and category pages are properly indexed by search engines.
Security: Install Wordfence (free) or Solid Security (free). Both scan for malware, limit login attempts, and alert you to suspicious activity. Configure the login security settings immediately after installation.
Caching and performance: Install WP Super Cache (free) or use your host’s built-in caching if available. Caching reduces server load and speeds up page delivery for returning visitors.
Backups: Install UpdraftPlus (free). Go to its settings and connect it to a remote storage location like Google Drive or Dropbox. Schedule daily backups. A backup saved only on the same server as your site is not a real backup.
SMTP: As covered in Step 9, install WP Mail SMTP and connect it to a transactional email service.
Woocommerce Setup Guide Step 13: Test Your Store Before Going Live
Do not skip this step. Place at least one real test order going through the full purchase process before you open your store to customers.
Checklist before launch:
- Product page displays correctly with images, description, and price
- Add to cart works and the cart page updates correctly
- Checkout page loads and all required fields appear
- Payment gateway processes a test transaction successfully
- Order confirmation email arrives in inbox (not spam)
- Order appears in WooCommerce > Orders in your dashboard
- Shipping rates display correctly at checkout for your primary destinations
- Tax calculations appear correctly at checkout
- Mobile checkout works and is easy to complete on a phone
- Legal pages published: Privacy Policy, Terms of Service, Refund Policy
Most hosting dashboards have a maintenance mode or coming soon page option. Keep this active until all tests pass. For help understanding WooCommerce’s total running costs after launch, see what it costs to start an online store.
Woocommerce Setup Guide: What to Do After Launch
Your store is live. These are the next priorities in order.
Connect Google Analytics 4: Install the free GA4 plugin (Google for WooCommerce) and connect it to your Google Analytics account. Enable enhanced ecommerce tracking so you can see revenue, conversion rate, and cart abandonment data.
Enable High Performance Order Storage (HPOS): Go to WooCommerce > Settings > Advanced > Features and enable the new order storage system. HPOS significantly improves query performance for stores with more than a few hundred orders.
Review your backup schedule: Confirm UpdraftPlus is running and backups are going to your remote storage.
Set up a staging environment: Most managed WordPress hosts offer one-click staging. Create a staging copy of your live site so you can safely test plugin updates and theme changes before pushing them live.
For a comparison of WooCommerce against Shopify as your store grows, see Shopify vs WooCommerce. For a breakdown of what WooCommerce costs at different revenue levels, see Is Shopify Worth It which includes the WooCommerce cost comparison at the same revenue tiers.
Startups
Perfect for early stage businesses looking for an affordable, customizable, and scalable eCommerce platform to quickly launch their online store with minimal setup.
Enterprise
Scalable solution for large businesses requiring robust features, extensive integrations, and high performance to handle complex product catalogs and heavy traffic.
Agencies
Manage multiple clients’ eCommerce websites efficiently with WooCommerce’s flexible architecture, allowing for custom development and seamless client onboarding.
Developers
API-first approach and extensive documentation empower developers to build custom extensions, integrate with third-party services, and tailor WooCommerce to unique business needs.
Frequently Asked Questions
How long does WooCommerce setup take?
The complete woocommerce setup guide covers approximately 2 to 3 hours for a new store from choosing a host to adding the first product and running a test order. The longest steps are configuring shipping zones and tax rates, especially if you ship to multiple regions or have complex tax obligations. Installing WordPress, WooCommerce, and the essential plugins takes 30 minutes or less.
Do I need coding skills to set up WooCommerce?
No. The entire woocommerce setup guide outlined above requires no code. Every step is done through the WordPress dashboard and WooCommerce settings panels. Coding skills become useful later if you want to customise theme templates, add custom functionality, or build specific integrations. For a basic working store, none of that is required at launch.
What is the minimum cost to run a WooCommerce store?
A minimal working WooCommerce store costs approximately $30 to $60 per month: managed WordPress hosting ($30 to $50), domain renewal ($1 to $1.50 amortised monthly), and WooPayments or Stripe with no monthly fee (you pay only per transaction at 2.9% + $0.30). Premium themes and additional plugins add cost on top of this, but the core store can run on free tools.
What payment gateway should I use?
WooPayments (built into WooCommerce, powered by Stripe) is the simplest starting point. It requires no separate account and supports credit cards, Apple Pay, and Google Pay. The transaction fee is 2.9% + $0.30 for standard US cards. If you already have a Stripe account, using the direct Stripe plugin gives you the same rate with the familiar Stripe dashboard. PayPal is worth adding as a secondary option since many customers prefer it.
Can I set up WooCommerce without a WordPress website?
No. WooCommerce is a plugin for WordPress. You need a functioning WordPress installation to use it. If you want a hosted ecommerce platform that does not require separate hosting and WordPress setup, Shopify is the main alternative. For a comparison of both approaches, see Shopify vs WooCommerce.
How do I handle taxes in WooCommerce?
Enable taxes in WooCommerce > Settings > General, then configure rates in the Tax tab. For US stores, install the free WooCommerce Tax plugin (powered by Jetpack) for automated rate calculation across all US states. For EU stores, configure VAT rates per member state or use a VAT automation extension. Note that WooCommerce calculates taxes at checkout but does not file or remit taxes on your behalf. Tax filing remains your responsibility.
What security measures should I take after setup?
Install a security plugin (Wordfence or Solid Security), use a strong unique password for your admin account, enable two-factor authentication, keep WordPress, WooCommerce, and all plugins updated, configure automated daily backups to remote storage, and ensure your SSL certificate is active and valid. Your hosting provider typically handles server-level security; the security plugin handles application-level protection.
What to Read Next
For a full comparison of WooCommerce and Shopify with cost calculations at each revenue level, see Shopify vs WooCommerce.
For a realistic breakdown of what WooCommerce costs to run at $1,000, $5,000, and $25,000 per month, see Is Shopify Worth It, which compares WooCommerce and Shopify total costs at the same revenue tiers.
For an understanding of the full cost of starting an online store including one-time setup costs, see what it costs to start an online store.
For official WooCommerce documentation including detailed configuration guides for every settings panel, see the WooCommerce documentation.
For WooCommerce’s official guide to configuring all settings tabs, see Configuring WooCommerce settings.